 |
|
 03-24-2018, 09:27 AM
|
#1
|
|
Site Sponsor
Join Date: Nov 2016
Location: Vancouver BC
Posts: 1,520
|
 Fiber board wall
The kitchen side wall has a fiberboard placed on top of the inner metallic skin. In my case, a leak has caused mould to grow underneath this fiberboard and I am in the process of removing it.
Has anyone replaced this board? If so, what did you replace it with?
|

|

|
|
03-24-2018, 10:57 AM
|
#2
|
|
Site Team
Join Date: Feb 2003
Location: The mountains of Scottsdale, AZ, and the beaches of Maine
Posts: 10,105
|
Larry -
You are asking about the wall above the kitchen sink, right? Once you have removed the fiber board, I'm not convinced that there is a need to replace it at all, if the aluminum skin beneath it is in good shape. Maybe a coat of paint?
The wall above the stove might be a different story. The fiber board might be an insulating layer against the heat of the sotve and stovetop.
Bill
|
|
|
|
|
03-24-2018, 12:04 PM
|
#3
|
|
Site Sponsor
Join Date: Nov 2016
Location: Vancouver BC
Posts: 1,520
|
Bill,
That's what I'm thinking, but if there is ugly staining I'll want to paint or place a piece if new fibre board. One benefit to having fibreboard is that any srews have more to bite and grip to.
|
|
|
|
|
04-03-2018, 06:25 PM
|
#4
|
|
Site Sponsor
Join Date: Nov 2016
Location: Vancouver BC
Posts: 1,520
|
I've been thinking about that wall again. I always wondered how a thin sheet of aluminum would support a loaded cupboard, and was somewhat uncomfortable with the weight of that cupboard on the wall. I knew, however, that TM have had this for a long time with no record of failure.
I think that fibreboard provides some support for the cupboard that I should not ignore. I plan to get a sheet of 1/8" plywood, Varathane it, then reinstall it in a similar manner that it was before with rubber cement and staples, tucked behind the crown moulding. I may make it so that it goes right to the front of the trailer instead of stopping at the small side window.
|
|
|
|
|
04-19-2018, 12:34 AM
|
#5
|
|
Site Sponsor
Join Date: Nov 2016
Location: Vancouver BC
Posts: 1,520
|
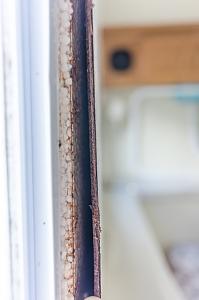
Part of the wall repair is going to require a repair to the bag seal between the shells. The wall extends to the edge of the shell and meets up with the trim covering the bag seal where it is stapled to a word strip. That wood strip is now a mouldy pile of dust that must be replaced.
Option one is to use vinyl wood. the first problem is finding a good glue to bond it to the aluminum and styrofoam. Polyurethane glue expands into pores andis a great choice for bonding wood to aluminum. Neither vinyl nor aluminum is porous, so a different glue may be better. The second problem I encountered is that Home Depot only has "planed" vinyl which means 1" is actually 7/8". That's no good either.
Option 2 looks better now, to use treated wood. I can cut what I need from 2×4 stock, coat with and cut sealer, and use polyurethane glue. That should last a good long time anyway.
|
|
|
|
|
04-29-2018, 10:14 AM
|
#6
|
|
Site Sponsor
Join Date: Nov 2016
Location: Vancouver BC
Posts: 1,520
|
I have the new panel ready to install now. When I removed the original panel, there were about 6 globs of rubbery glue. I think it was rubber cement, but I'm wondering if anyone one out there can confirm this for me.
|
|
|
|
|
05-02-2018, 03:00 PM
|
#7
|
|
Site Sponsor
Join Date: Nov 2016
Location: Vancouver BC
Posts: 1,520
|
I just removed the lower trim piece that holds the wood panel and flaps in place. Due to rusted screws, I had to cut each screw off. The box portion of the TM is in the way of getting a screwdriver directly on the screws.
I will look into a vinyl replacement for the foam core them that is all broken up now. I will also secure it to the lower aluminium frame rail of the shell by inserting the screw at an angle.
Can I use any cheap foam to replace the old foam strip from the seal?
|
|
|
|
|
05-06-2018, 07:41 PM
|
#8
|
|
Site Sponsor
Join Date: Nov 2016
Location: Vancouver BC
Posts: 1,520
|
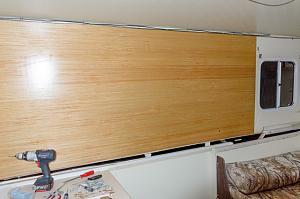
1/8" finished ply installed.
The lower edge was screwed into the lower frame rail of the shell. I spent awhile trying to figure the best way to install the screws between the box and shell to do this. I decided to raise the lift arm a few inches by loosening the lift arm bolts from the torsion bar. This was quite easy. Now I can install the screws and flaps easily.
The foam core wood is being replaced with vinyl drip cap trim. This was the best replacement I could find.
|
|
|
|
|
05-06-2018, 10:53 PM
|
#9
|
|
Site Sponsor
Join Date: Nov 2016
Location: Vancouver BC
Posts: 1,520
|
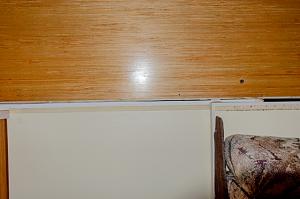
Here are some pictures. It doesn't look very exciting at the moment. I still have to install the bottom shell seal and flap system, and cut a hole for the window.
This shows one of my booboos. They say measure twice. I measured wrong twice! (I measured for the pivot hole to get the distance between centres, so I measured edge to edge. That would have been fine, except I measured from the right side of the first pivot to the left side of the second. Argh. I'm thinking of a plug I may be able to add to cover the entire nut.
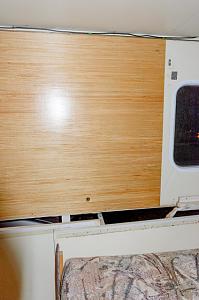
This shows how I managed to raise one side of the shell up high enough to enable screwing directly into the lower frame rail. This will also enable me to staple the seal properly.
|
|
|
|
|
05-06-2018, 10:55 PM
|
#10
|
|
Site Sponsor
Join Date: Nov 2016
Location: Vancouver BC
Posts: 1,520
|
I noticed today that with the foam seal and old fibre board out, I can barely detect any mildew smell. I'm still not sure what kind of foam was used. I may just reuse the old foam in this case for now. I am designing this so I can replace the foam seal much easier next time.
|
|
|
|
|
|
|
Currently Active Users Viewing This Thread: 1 (0 members and 1 guests)
|
|
|
 Posting Rules
|
You may not post new threads
You may not post replies
You may not post attachments
You may not edit your posts
HTML code is Off
|
|
|
|
 » Recent Threads
 |
|
|
|
|
|
|
|
|
|
|
|
|
|
|
|
|
|
|
|
|
|
|
|
|
|


 Linear Mode
