 |
|
 07-07-2017, 08:51 PM
|
#1
|
|
Senior Member
Join Date: Mar 2015
Location: Omaha, NE
Posts: 239
|
 300 W on a 2720SL -- 2 flex & 1 rigid
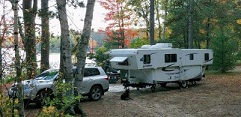
I would like to share information on my solar install. I'm getting it all ready for boondocking on the north shore of Lake Superior the last week of July.
I can't really take much credit for the design -- much of it came from this forum and one member in particular, rickst29.
I'm installing an array of 3x100W panels -- 2 of them are flexible (mainly to keep the weight down) and 1 rigid panel straddles the center seam of the rear shell. The performance characteristics of the rigid matches those of the flexible panels pretty closely so it works out well. The panels are wired in series to produce a maximum voltage of about 50V and maximum current of around 5.5A The panels feed into a EP Solar Tracer 2215BN that will charge the two GC2 batteries (225 AH).
I opted for 3 panels to offset the energy loss since the panels are mounted flat on the shell and not able to tilt for maximum insolation.
At this point, I have the two flexible panels attached -- I'm waiting on some video/power cable to arrive tomorrow so that I can attach a video camera to the aluminum frame of the rigid panel before I install that one.
I first installed some Cordmate III plastic wiring channel just behind the bag seal and down the street-side window. Nothing new here; there are plenty of posts showing how others have installed this to hold/hide the wiring.
Following rickst29's suggestions, I used 3M RP32 adhesive tape to attach the flex panels. I pulled the protective covering of the tape at the ends of the segments so that I could easily pull it off as I was laying the panel down:

After I cleaned the shell surface with Awesome Orange cleaner and 50% alcohol solution, I put the top of the panel against the wiring channel and carefully pulled the protective covering off of the top strip and pressed it down. I was able to hold the flexible panel up with my bald head and one hand while I progressively removed the protective covering off of the next set of tape segments. This made attaching the panels by myself relatively easy.
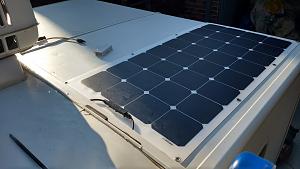
I then used a rat-tail file on the wiring channel to provide a place for the panel wires to enter the channel. I repeated all of this on the other side of the shell and here's the result:
Boy, after cleaning the portion of the rear shell, the rest looks especially dirty. I guess I'll be doing the same on the rest of the trailer!
Tomorrow I plan on attaching the rigid panel provided some additional materials arrive in the mail. I'll continue the thread then.
__________________
[SIGPIC][/SIGPIC]
TM: 2005 2720SL -- lift kit, 15" Maxxis, LEDs, Husky ejack, GenPro soft start, 2300W gen, "H-Bridge", 1.44 cf Edgestar frig/freezer, 2xGC2, 1KW Inverter w/auto xfer switch, Trimetric Batt Monitor, 300W Solar (1 glass & 2 flex panels), EP Solar MPPT, Thetford Curve
TV: 2021 F-150 PowerBoost XLT Hybrid -- 7.2 kW Onboard Generator Option
Previous TV: 2012 Traverse -- "Stockton" 24V Boost Device
Map of where we've camped in our TM:
http://visitedstatesmap.com/image/IAMNMONEsm.jpg
|

|

|
|
07-09-2017, 08:43 PM
|
#2
|
|
Senior Member
Join Date: Mar 2015
Location: Omaha, NE
Posts: 239
|
My parts were a day late coming so I didn't get to installing the glass panel until today.
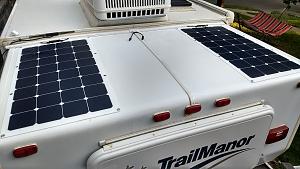
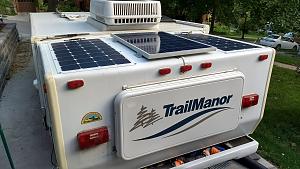
The glass panel is mounted on 4 z-brackets supplied by Renogy (as suggested by rickst29). The 3M tape was affixed to the brackets and anchored to the roof. I carefully cleaned roof with the Awesome Orange cleaner and 50/50 alcohol solution where the brackets would come to rest. Here's a shot of all three mounted:
These three panels add just over 25 lbs to the weight of the rear shell so there shouldn't be too much difference in lifting it.
As mentioned in my earlier post, I used the CordMate III channels to hold all of the panel and camera wiring. Here's a shot of the wire channels holding all of the wires.
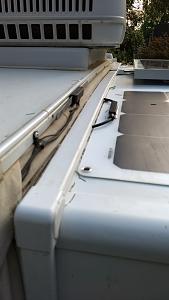
I must say, it's very difficult to close the channel cover wherever the MC-4 connectors are located. I hope they'll stay closed. I also plan to apply some caulk/adhesive where the channel meets the roof to make sure it stays there.
I need to pick up some screws to mount the backup camera tomorrow. This little camera was previously used on my TV but it was mounted in a location that was often bumped. I used a different camera that better resembled an OEM installation so I had this one as an extra. I've run the video cable up to the area of the electric jack where I'll be mounting a wireless transmitter in a PVC (waterproof) electrical box (which will be pipe-clamped to the jack tube). The transmitter's power will be manually switched on and the TV camera (which uses another identical wireless transmitter) will be switched off. In that way, I can choose which backup camera to view (TV or trailer) on the screen between the driver and passenger seats. Here's the trailer backup camera as it exists now -- it will be attached to the glass panel frame:
Next, I'll be routing all of the wiring to the street-side lift arm and getting them to the rear "electrical room".
__________________
[SIGPIC][/SIGPIC]
TM: 2005 2720SL -- lift kit, 15" Maxxis, LEDs, Husky ejack, GenPro soft start, 2300W gen, "H-Bridge", 1.44 cf Edgestar frig/freezer, 2xGC2, 1KW Inverter w/auto xfer switch, Trimetric Batt Monitor, 300W Solar (1 glass & 2 flex panels), EP Solar MPPT, Thetford Curve
TV: 2021 F-150 PowerBoost XLT Hybrid -- 7.2 kW Onboard Generator Option
Previous TV: 2012 Traverse -- "Stockton" 24V Boost Device
Map of where we've camped in our TM:
http://visitedstatesmap.com/image/IAMNMONEsm.jpg
|
|
|
|
|
07-10-2017, 04:16 PM
|
#3
|
|
Member
Join Date: Sep 2015
Posts: 37
|
Genius on the back up camera being mounted to the solar panel. I want to do both mods and know I can get both done at the same time!
Nice job.
__________________
2007 Trailmanor 3124 kb
|
|
|
|
|
07-10-2017, 07:13 PM
|
#4
|
|
TrailManor Master
Join Date: Jan 2014
Location: Somerset, OH
Posts: 1,868
|
very nice installation. I like the flexible panels.
__________________
Art & Joyce
Current camper: Motor Home
Previous: 2009, 3023-QB and 2003 2720
|
|
|
|
|
07-11-2017, 10:09 AM
|
#5
|
|
TrailManor Master
Join Date: Aug 2015
Location: Rochester, NY
Posts: 1,837
|
That looks about as close to "looks like it came from the factory" as it gets! Very nice job!
__________________
2007/21 TM 3326 (Pride of the Fleet)
2000 2720SL (Rebuild Project)
2002 2619 (Parts TM)
SMARTER THAN GOOGLE!
|

|
|
|
07-11-2017, 12:15 PM
|
#6
|
|
Senior Member
Join Date: Mar 2015
Location: Omaha, NE
Posts: 239
|
Thanks all of you for the kind words.
I got a PM from rickst29 mentioning that I should make sure the panel ground must be grounded and not be on a connector. I'm cutting off the anderson connector and take his advise for safety's sake. Glad I have his support along with all of the rest of you folks on the forum.
Been in the 90's with 80%+ humidity here so I'm not getting as much done as I'd like. I was able to route the wiring in CordMate III down the lift arm. I ensured I had enough extra looped at the shell/arm joint by opening and closing a few times. I also affixed the backup camera.
I'll be working on getting the ends into the rear compartment next. Pictures to follow.
__________________
[SIGPIC][/SIGPIC]
TM: 2005 2720SL -- lift kit, 15" Maxxis, LEDs, Husky ejack, GenPro soft start, 2300W gen, "H-Bridge", 1.44 cf Edgestar frig/freezer, 2xGC2, 1KW Inverter w/auto xfer switch, Trimetric Batt Monitor, 300W Solar (1 glass & 2 flex panels), EP Solar MPPT, Thetford Curve
TV: 2021 F-150 PowerBoost XLT Hybrid -- 7.2 kW Onboard Generator Option
Previous TV: 2012 Traverse -- "Stockton" 24V Boost Device
Map of where we've camped in our TM:
http://visitedstatesmap.com/image/IAMNMONEsm.jpg
|
|
|
|
|
07-11-2017, 09:18 PM
|
#7
|
|
Senior Member
Join Date: Mar 2015
Location: Omaha, NE
Posts: 239
|
Here's a bit more detail on the wiring that runs from the panels to the rear battery compartment.
I ended up using a heat gun in the vicinity of the panel MC-4 connector (the positive line coming from the street-side flex panel). I couldn't get the CordMate III to snap closed. You'll notice a bit of waviness of the surface but at least it closes now.
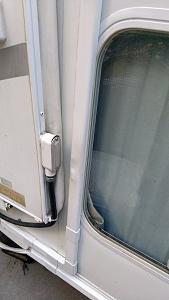
The CordMate III included enough connectors for everything but I ended needing a few more feet of channel so I bought another "kit". I used up some of the "joining" connectors (I think that's what the directions called them) for re-enforcement. When things are all connected, I'll probably put a little caulking to help keep them in place. I think I'll also take some white cable ties and cinch them around the lift arms to help ensure they won't go anywhere. They look a bit dirty but if I have time before a trip on 7/22 I'll give them a shot of white Rustoleum Fusion plastic paint.
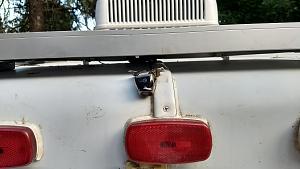
When the channel reaches the bottom of the shell, it makes a turn toward the front of the trailer and terminates at the pocket stop. At this point, the wires become exposed to the elements as they loop to the lift arm. I used some spiral wrap to keep the wires contained (picked the wrap up at Home Depot close to where the CordMate III was located). I open and closed the rear shell to make sure there was no binding of the wiring bundle .
 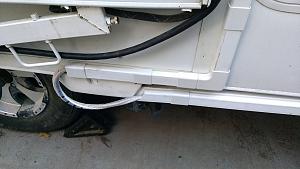
I again used some spiral wrap on the bundle of wires where the channel terminated at the torsion bars. I loosely secured the wrapped bundle to one of the torsion bars. You might be able to make out the dark video cable from the camera that separates from the others and heads up inside the street-side rectangular frame member to the hitch area. The remaining wires make a u-turn into the street-side rear bumper area.
 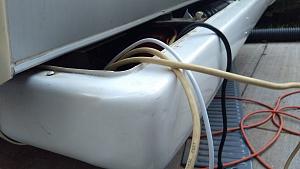
My next step will be to cover the solar panels so very little power is on the wire. Then I can safely fish the three wires into the rear battery area that I call the "electrical room" and make some terminations. Before I do that, though, I'll need to program the MPPT controller for the proper charging of the two Trojan T-105's.
__________________
[SIGPIC][/SIGPIC]
TM: 2005 2720SL -- lift kit, 15" Maxxis, LEDs, Husky ejack, GenPro soft start, 2300W gen, "H-Bridge", 1.44 cf Edgestar frig/freezer, 2xGC2, 1KW Inverter w/auto xfer switch, Trimetric Batt Monitor, 300W Solar (1 glass & 2 flex panels), EP Solar MPPT, Thetford Curve
TV: 2021 F-150 PowerBoost XLT Hybrid -- 7.2 kW Onboard Generator Option
Previous TV: 2012 Traverse -- "Stockton" 24V Boost Device
Map of where we've camped in our TM:
http://visitedstatesmap.com/image/IAMNMONEsm.jpg
|
|
|
|
|
07-12-2017, 10:23 PM
|
#8
|
|
Site Sponsor
Join Date: Mar 2015
Location: Everett, WA
Posts: 213
|
Remote?
Nice job! Did you get the MT-50 Remote Meter LCD Display? I love mine.
__________________

TM: 2007 2720 (QB) TV: 2010 Toyota Highlander Hybrid
Hopkins INSIGHT brake controller, Andersen No-Sway WDH
CARCHET Solar Powered TMPS
Dometic CRX-1110 AC/DC Compressor Fridge, 200 W Solar
|
|
|
|
|
07-13-2017, 06:22 AM
|
#9
|
|
Senior Member
Join Date: Mar 2015
Location: Omaha, NE
Posts: 239
|
Yes, inghamm, I did get the MT-50 and spent what little spare time I had last night programming the battery settings. I like it too -- the default display will show me all important information at a single glance.
I didn't have much luck getting the wires fished from the bumper to the rear compartment, though. The flex conduit that I have running between the two areas just doesn't have the room for the new wires. I'll have to punch another hole.
__________________
[SIGPIC][/SIGPIC]
TM: 2005 2720SL -- lift kit, 15" Maxxis, LEDs, Husky ejack, GenPro soft start, 2300W gen, "H-Bridge", 1.44 cf Edgestar frig/freezer, 2xGC2, 1KW Inverter w/auto xfer switch, Trimetric Batt Monitor, 300W Solar (1 glass & 2 flex panels), EP Solar MPPT, Thetford Curve
TV: 2021 F-150 PowerBoost XLT Hybrid -- 7.2 kW Onboard Generator Option
Previous TV: 2012 Traverse -- "Stockton" 24V Boost Device
Map of where we've camped in our TM:
http://visitedstatesmap.com/image/IAMNMONEsm.jpg
|
|
|
|
|
07-13-2017, 07:52 AM
|
#10
|
|
TrailManor Master
Join Date: Apr 2014
Location: Orlando
Posts: 2,796
|
Nice job. My two 100W panels seem a little larger than yours and both are like your center panel, raised slightly off the surface of the roof so air can circulate under and keep the heat of the panel off the roof.
Mine add 33 lbs to the top of the module. Today I think I'd go with a pair of the 150W panels. though a bit heavier (53 lbs for two).
__________________
Looking for a 24/17 in or near Florida.
|
|
|
|
|
|
|
Currently Active Users Viewing This Thread: 1 (0 members and 1 guests)
|
|
|
 Posting Rules
|
You may not post new threads
You may not post replies
You may not post attachments
You may not edit your posts
HTML code is Off
|
|
|
|
 » Recent Threads
 |
|
|
|
|
|
|
|
|
|
|
|
|
|
|
|
|
|
|
|
|
|
|
|
|
|


 Linear Mode
