 |
 04-24-2017, 09:03 PM
|
#1
|
|
Site Sponsor
Join Date: Nov 2016
Location: Vancouver BC
Posts: 1,520
|
 2001 2720 outer shell rot!
I knew I was taking a gamble when I bought my 2720, but I paid $4500 for it and figured I could fix just about anything on it. It appears I'll have to replace some of the wood in the outer shell at least. I believe we can still use it for camping this summer, but it looks like I should plan on rebuilding the outer shell soon.
I found two sources related to this:
The HappyTrails repair blog: http://www.trailmanorowners.com/foru...ad.php?t=10660
Unfortunately many of the pictures are lost, even in the pdf version.
and this: http://trailmanorrepair.blogspot.com...2_archive.html
This does have extensive pictures.
HappyTrails seems to be able to do all this without removing the torsion bars, but with most of the pictures missing, it's extremely difficult to interpret a few of his methods. I may be able to figure it out, not sure...
The Trailmanor repair blog outlines a method that involves removing the side wall, which also involves separating the lift arms from the torsion bars. He has lots of pictures, but sounds not too safe.
Am I right to attempt HappyTrails method?
Is there anyone on this site who can help me interpret his method?
About how long would it take to complete one side of one shell if I replace all the wood?
|

|

|
|
04-24-2017, 10:13 PM
|
#2
|
|
Site Team
Join Date: Feb 2003
Location: The mountains of Scottsdale, AZ, and the beaches of Maine
Posts: 10,098
|
Use the Search tool to locate a similar blog by our member named Maria.
Bill
|
|
|
|
|
04-24-2017, 11:44 PM
|
#3
|
|
Site Sponsor
Join Date: Nov 2016
Location: Vancouver BC
Posts: 1,520
|
Thanks Bill, that was helpful to have her name to search here. I think the trailmanorrepair.blog link I posted is Maria's blog you were referring to.
If Maria is still watching, or if some one else knows, can the same repairs be made without removing the side wall? Or is it actually much easier to do with the side wall removed? I can't get a sense of that from searching Maria's posts here.
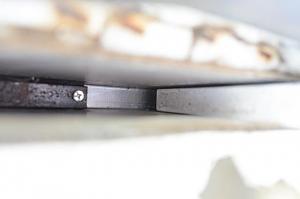
The end screws that went into the rotted wood for the bag seal were in quite bad shape. The screws on the bottom edge were a little rusted, but not nearly as bad. Also, the bottom screws still had bite and tightened up well.
|
|
|
|
|
04-27-2017, 08:45 AM
|
#4
|
|
Site Sponsor
Join Date: Nov 2016
Location: Vancouver BC
Posts: 1,520
|
From the Happy Trails repair blog ( http://www.trailmanorowners.com/foru...ad.php?t=10660)
In the following paragraph:
In the above picture, what you see is where I knocked the old wood out completely out of the wall section, and replaced it with a 1"x1" piece of aluminum purchased at the local hardware store. To get it where I could work on it, I simply left the shell locked down, and inserted an old mop handle that was sitting atop a car jack. In retrospect, I probably should have put a small 2x4 above the mop handle so's not to put all the stress on one spot, but it turned out to be ok. I jacked it up a couple of inches, and voila', got it where I could work on it very easily. I then gently knocked out what wood was remaining with a chisle and rubber mallet, (there wasn't much), and blew it all out with my air compressor to clean and dry it out real good.
As per the Trailmanor factory, I just had to cement it in place with contact cement, but to take it a step further, I did some extra and drilled pilot holes every 15" and used 1" stainless steel screws to secure it in place. (Any longer than that, and it would have drilled right through to the inside). So what you see here is the finished wall section. As for the ceiling part, well, you can see there's not much wood left in it either, to include that small chunk down towards the rear, most of it was rotted out. Again, I simply used my chisle and mallet and got the rest out leaving only the screws that were there to secure the ceiling to the wall hanging down and a few rogue staples.
I'm trying to figure out exactly what the original author was jacking up with the mop handle. If possible, I'd like to avoid disconnecting the torsion bars as Maria's DH did.
|
|
|
|
|
04-27-2017, 09:53 AM
|
#5
|
|
Site Team
Join Date: Feb 2003
Location: The mountains of Scottsdale, AZ, and the beaches of Maine
Posts: 10,098
|
Don't know. But maybe jacking the roof up off the top of the wall? This would give him access to either the top of the wall frame, or the edge of the roof frame.
Bill
|
|
|
|
|
04-27-2017, 12:13 PM
|
#6
|
|
Site Sponsor
Join Date: Nov 2016
Location: Vancouver BC
Posts: 1,520
|
Thank you Bill!
I'm starting to get a picture of this in my mind. I think IF I had to separate the side wall from the roof, I would want to:
a) lift the roof to release the tension on the torsion bars
b) support the roof section from inside AND outside underneath the other wall to prevent the whole thing from tipping over
c) separate the wall from the roof section.
If I do not support the roof/wall in this way, once I separate the wall section all the weight of the side wall might twist sideways and begin to tear out at the pivot points. Perhaps this is why Maria's DH chose to remove the side wall instead of work on it while it was in place. I still hope to hear from Maria on their project.
The screws along the bottom seemed to grip really well. The only ones that were not gripping were the screws into the vertical rotted wood for the bag seal. If I'm lucky, the rest of the shell is aluminum.
|
|
|
|
|
04-29-2017, 08:57 AM
|
#7
|
|
Site Sponsor
Join Date: Nov 2016
Location: Vancouver BC
Posts: 1,520
|
I took a look at the structure along the bottom edge of the shells. I see 1x1 aluminum tubing all along the bottom edge and going up the back ends. I cannot see the inside supports, but I'm assuming that my shell is primarily aluminum.
I presume, then, that the wood that has rotted is for the bag seal, and should be fairly easy to replace.
|
|
|
|
|
04-29-2017, 10:48 AM
|
#8
|
|
Site Team
Join Date: Feb 2003
Location: The mountains of Scottsdale, AZ, and the beaches of Maine
Posts: 10,098
|
Aluminum frame in a 2001 2720SL? That's good to know. I know that my 2002 2720SL had aluminum, but I've been assuming that 2002 was the first year. We live, we learn. It illustrates the common problem of believing that all TM design / production changes happened only at the beginning of a new model year, and that they were incorporated into all models at once. This may be true in cars, but it is definitely not true in TMs, where changes were phased in whenever they were ready.
As for your specific question, it sounds like the rot you are seeing is in the wood backer for the bag seal, as you said. The bag seal is stapled in place, and staples wouldn't penetrate aluminum tubing very well. If so, you are in luck!
If you want to double check, you can remove the piece that covers the side of the upper entry door frame. This will let you see the vertical framing piece inside the wall. I did this long ago, when I needed to strengthen the stirrup part of the hold down latch. I'll see if I can find the thread, and list it here. Check back.
Bill
[EDIT: Yup, it was way back in 2003. http://www.trailmanorowners.com/foru...ead.php?t=537]
|
|
|
|
|
04-30-2017, 03:21 PM
|
#9
|
|
Site Sponsor
Join Date: Oct 2004
Location: Southeast of Houston, Texas
Posts: 1,089
|
My 2001 also has aluminum framing in the top shells, at least along the bottom edges, which is all I can see easily.
|
|
|
|
|
04-30-2017, 04:22 PM
|
#10
|
|
Site Sponsor
Join Date: Nov 2016
Location: Vancouver BC
Posts: 1,520
|
There is one other place that can be inspected quickly and easily for aluminum vs wood framing, and that is the pocket support. The end will be wood for the bag seal, but the top and sides will be aluminum if you have a metal framed shell.
|
|
|
|
|
|
Currently Active Users Viewing This Thread: 1 (0 members and 1 guests)
|
|
|
 Posting Rules
|
You may not post new threads
You may not post replies
You may not post attachments
You may not edit your posts
HTML code is Off
|
|
|
|
 » Recent Threads
 |
|
|
|
|
|
|
|
|
|
|
|
|
|
|
|
|
|
|
|
|
|
|
|
|
|


 Linear Mode
