 |
|
 08-07-2011, 03:44 PM
|
#1
|
|
Guest
|
 Wood frame repair - advice needed
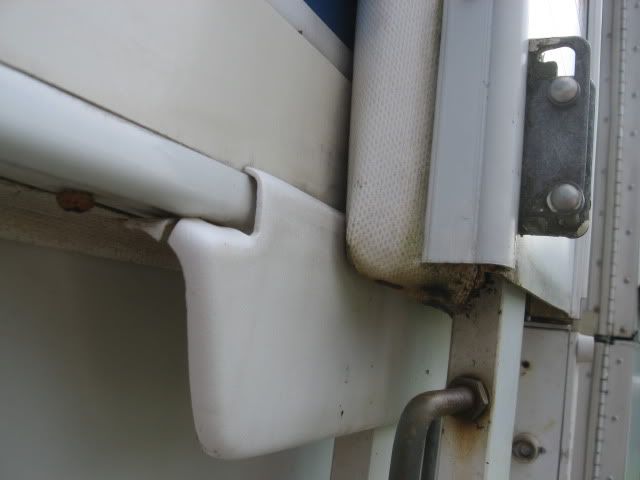
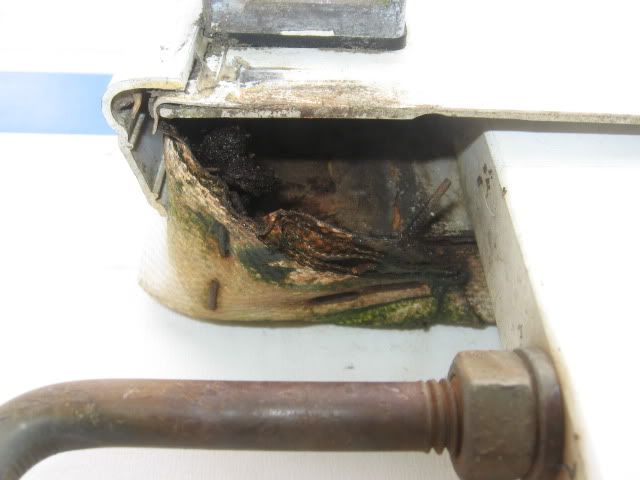
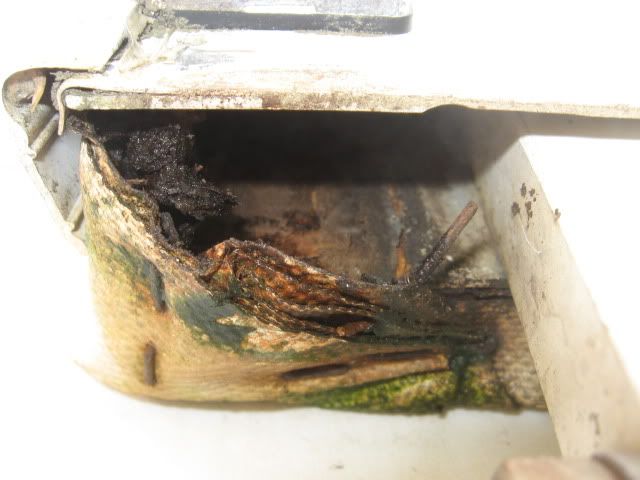
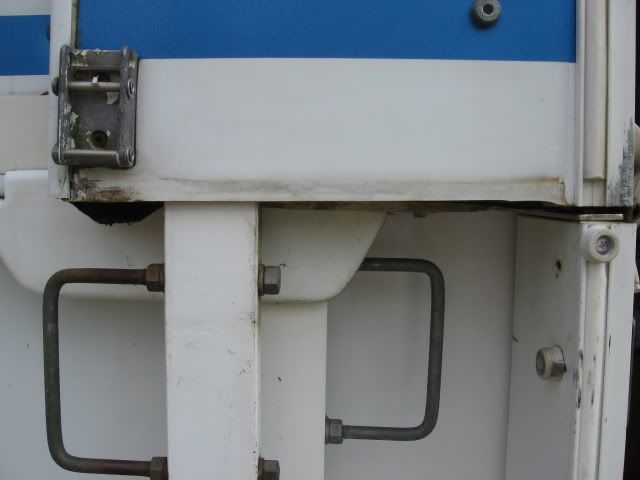
In my ongoing battle against entropy's effects on my TM, I just finished replacing the completely rotten (and largely nonexistent) vertical wood frame piece on the latch side of the door (upper shell). During this little diversion, I discovered that the wood frame on the rear end of the upper shell (same area) is also largely gone. (see pics)
Where advice would be helpful is in figuring out how to access the back side of the shell to insert screws. The arm pocket has screws that hold it in from both sides (interior & exterior), so these will need to be replaced. When I did the door frame, I could get to both sides because it was accessible. This part won't be easy to access because of the shell overlap. Even with the rear shell completely down, I still won't be able to get to all of the "inside" screw locations. All I can think of at the moment would be to drop the rear shell, and then unbolt both rear arms from the front shell to allow it to pivot down at the front & up at the back - thereby exposing the interior side of my entire work area.
Any input very much appreciated!
Steve
|
|
|

|
|
08-08-2011, 07:55 AM
|
#2
|
|
Guest
|
Try MariaG's Blogspot about rebuilding her 1986 TM25: TrailManor Repair Blogspot.
I did a quick scan and there is good info on replacing rotted wood. They did some extensive work. Frankly I think they should have been paid to take the TM they did for the amount of work they did.
This is a link to photo and written record of Happy Trails...The Rebuilding of a TM 25
Hope this helps...
|
|
|
|
|
08-08-2011, 08:29 AM
|
#3
|
|
Guest
|
Hey, thanks for the links - I had already found the MariaG's site, but not the one from HappyTrails. I'll spend some time reviewing it as well.
Sorry to see your TM is no more (from your sig.). Hope you're physically & financially okay...
Steve
|
|
|
|
|
08-08-2011, 09:45 AM
|
#4
|
|
Site Sponsor
Join Date: Jul 2006
Location: Sunny Beaches of Los Angeles
Posts: 3,239
|
The factory has a diagram that shows how you remove the shells. I have a copy, but cannot immediately put my hands on it. I forget which end gets detached, but once removed, you lay 2x4s across the lower box of the TM (the lower walls) from side to side. The shells then rest on those 2x4s.
I'll see if I can find that drawing.
Dave
__________________
2000 2720SL & 2007 3124KB
2005 Toyota Sequoia
Twin Battle Born 12v 100Ah LiFePO4 (BBGC2) batteries, 300W solar on rear shell, Link 10, Lift kit, Maxxis 8008 225 75/R15 E tires
|

|
|
|
08-08-2011, 10:16 AM
|
#5
|
|
Guest
|
Quote:
|
Hope you're physically & financially okay...
|
Yeah, no one was hurt in either vehicle, but it did disturb the dogs slumber. Cost us two fun filled days at the Days Inn in Marianna. Very, very nice people in that town. It was a warm 1 mile walk to cruise Wal-Mart.
We did have to replace everything. I think we lost a couple of thousand dollars in the ordeal. The insurance company also found out just how hard it is to replace a 3326.
All in all, I think we came out OK though...
|
|
|
|
|
08-08-2011, 04:42 PM
|
#6
|
|
Guest
|
ng2951: Glad it all worked out... It's interesting - more often than not when we're forced out of our "routine" we encounter folks that restore our faith in humanity...
Dave: Thanks - I'll be interested to see it. I may also give Ed a call at the factory. I bet he'll have advice too...
|
|
|
|
|
08-09-2011, 06:36 PM
|
#7
|
|
Guest
|
Talked to Ed at the factory today. He was very helpful (as always) and said I was basically on the right track in terms of unbolting & tipping the shell up in order to access the overlapped area. He also sent me the PDF diagrams regarding the shell tipping as well as arm pocket repair information. I've attached them here in case anyone's interested.
Guess I know what I'll soon be doing...  That, and finding the new roof leak that's showing up around the crank-up vent. Bah.
|
|
|
|
|
08-09-2011, 07:19 PM
|
#8
|
|
Site Sponsor
Join Date: Jul 2006
Location: Sunny Beaches of Los Angeles
Posts: 3,239
|
Steve - That last attachment, "TOPS RAISED SKETCH.pdf", is the sketch I was thinking of. Glad you found it.
I think these documents should be added to our library.
Dave
__________________
2000 2720SL & 2007 3124KB
2005 Toyota Sequoia
Twin Battle Born 12v 100Ah LiFePO4 (BBGC2) batteries, 300W solar on rear shell, Link 10, Lift kit, Maxxis 8008 225 75/R15 E tires
|
|
|
|
|
08-13-2011, 04:08 PM
|
#9
|
|
Guest
|
I just purchased a '95 2720SL and found a similar issue on this camper today. Does anyone know the true dimension of the wood that was in this location?
It appears to be a true 1"x2", which I can make on the table saw. Just need to be sure of this is accurate. The material is so far gone I can't find a piece to measure.
|
|
|
|
|
08-16-2011, 04:29 AM
|
#10
|
|
Guest
|
Quote:
Originally Posted by Rkcrawl

I just purchased a '95 2720SL and found a similar issue on this camper today. Does anyone know the true dimension of the wood that was in this location?
It appears to be a true 1"x2", which I can make on the table saw. Just need to be sure of this is accurate. The material is so far gone I can't find a piece to measure.
|
On my '95 it turns out its 1" x 1.5".
|
|
|
|
|
|
|
Currently Active Users Viewing This Thread: 1 (0 members and 1 guests)
|
|
|
 Posting Rules
|
You may not post new threads
You may not post replies
You may not post attachments
You may not edit your posts
HTML code is Off
|
|
|
|
 » Recent Threads
 |
|
|
|
|
|
|
|
|
|
|
|
|
|
|
|
|
|
|
|
|
|
|
|
|
|


 Linear Mode
