 |
|
 03-11-2024, 12:58 PM
|
#1
|
|
Member
Join Date: May 2023
Posts: 14
|
 Low point drain leak
Hi all. The low point drain valve on my water heater is leaking. It is attached using a crimp band. I have attached a photo. Any recommendations on how to remove the crimp band and replace the valve? I tried to seal the leak on the original valve and add a 2nd valve under it but the original valve is still leaking so I need to remove it. Unless there is a way to seal the leak. I tried silicone but cant get it to stop. Open to ideas. 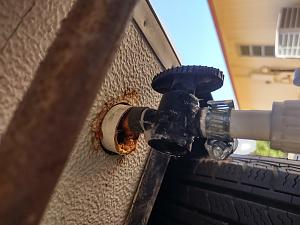
|

|

|
|
03-11-2024, 01:52 PM
|
#2
|
|
Site Team
Join Date: Feb 2003
Location: The mountains of Scottsdale, AZ, and the beaches of Maine
Posts: 10,104
|
You probably have no option other than to fix it from the inside of the TM, under the sink. My guess - I don't know your TM year or model - is that you will cut off the pipe a few inches above the floor, not too close to the water heater or any other joints. I would rebuild everything below the cut with glued joints - don't try to do crimped joints.
It is easy. If the pipe is PVC, you simply cut it off at some handy point under the sink, and use glued fittings to rebuild the assembly tht you are removing. If the pipe is PEX, you can't glue it, but a Sharkbite fitting will attach PEX to PVC, so you use the Shkbite to get you into PVC, and it is the same from there on. Get a new length of plain old Schedule 40 1/2" PVC pipe - 4 feet is plenty - and some push-fit (not threaded) fittings. You will need at least one PVC union, an elbow or two, and a small can each of purple primer and PVC cement. Each can should be marked "PVC, CPVC and ABS". You will also need a new valve, of course. Make all pipe cuts smooth and square.
Cut and dry-fit all the pieces of the assembly, to make sure it all fits right. When you have it right, disassemble it, and reassemble it in place, one joint at a time.
From Ace, Home Depot, Lowes, etc, total cost will be around $20, and glued joints are easy. Questions? This is the place to ask them.
Bill
|
|
|
|
|
03-11-2024, 03:12 PM
|
#3
|
|
Member
Join Date: May 2023
Posts: 14
|
Hi Bill. Thanks for your response and sorry for the photo. Don’t know why it is sideways. Here is a better one I hope. The leak is coming from the black valve. Everything above it is dry. I tried to seal the leak using silicone and added a 2nd valve under it, but the silicone did not seal the leak so I need to replace the valve. I just can’t figure out how to remove the metal (crimp) band holding it. Any ideas how to remove that so can put a new valve in? We have a 2007 2720SL. 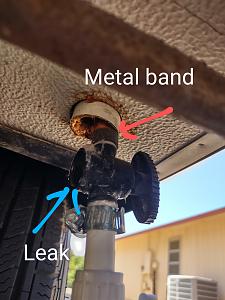
|
|
|
|
|
03-11-2024, 03:36 PM
|
#4
|
|
TrailManor Master
Join Date: Aug 2015
Location: Rochester, NY
Posts: 1,837
|
That’s the fresh water tank drain. You’re probably going to need to get a length of vinyl tube to replace the current one, which will be rock hard and not at all plyable, not to mention you’ll cut it so short you won’t be able to attach a new clamp.
At any rate here’s a link to the quarter turn valves. I would replace it while you’re in there, and order a spare to have on hand.
https://www.supplyhouse.com/sh/contr...oduct_id=43030
__________________
2007/21 TM 3326 (Pride of the Fleet)
2000 2720SL (Rebuild Project)
2002 2619 (Parts TM)
SMARTER THAN GOOGLE!
|

|
|
|
03-11-2024, 03:45 PM
|
#5
|
|
Member
Join Date: May 2023
Posts: 14
|
I was thinking of cutting /breaking apart the current valve to try and get it out without cutting the tubing. Like you said, if i cut the tube, it is too short to fasten a new clamp onto. Any ideas for removing the valve without cutting the tube? Open to any ideas. I really dont want to pull the kitchen sink if I can avoid it.
|
|
|
|
|
03-11-2024, 06:25 PM
|
#6
|
|
TrailManor Master
Join Date: Aug 2015
Location: Rochester, NY
Posts: 1,837
|
Trust me the hose will be so hardened you won’t be able to get the new one in.
Ask me how I know.
__________________
2007/21 TM 3326 (Pride of the Fleet)
2000 2720SL (Rebuild Project)
2002 2619 (Parts TM)
SMARTER THAN GOOGLE!
|
|
|
|
|
03-11-2024, 07:20 PM
|
#7
|
|
Site Team
Join Date: Feb 2003
Location: The mountains of Scottsdale, AZ, and the beaches of Maine
Posts: 10,104
|
Kevin -
There should be no need to pull the sink. Look around under the sink, figure out where the pipe in question comes up through the floor, then figure out how to get access to it. Removing the cabinet doors and the vertical stile between them is easy - a few wood screws - and will be like access magic. Been there.
If you really want to try, here are some thoughts. If the clamp is a circle with a protruding folded portion, you may be able to undo the fold enough with end nippers or a screwdriver to get the ring off. If it is a copper PEX ring, I don't think you can do it because there is nothing to grip or pry. Was TM using PEX or PVC in 2007? I don't know. I suppose an abrasive-edged grinding wheel on a Dremel tool might cut it, but it would most likely cut the pipe or hose under it, too. Not worth the effort, IMO.
Even if you can get the clamp off, I share Shane's concern about the condition of the pipe or hose above it. Sixteen years exposed to the road crud under an RV is asking a lot.
My suggestion is to go at it from inside. But if you decide to try it from the outside, you have little to lose but some time.
Let us know.
Bill
|
|
|
|
|
03-11-2024, 09:04 PM
|
#8
|
|
Member
Join Date: May 2023
Posts: 14
|
Thanks Bill and Shane. I will starting working on it from inside and let you know the results. Thanks so much for the guidance.
|
|
|
|
|
03-12-2024, 09:54 AM
|
#9
|
|
Site Sponsor
Join Date: Jul 2006
Location: Sunny Beaches of Los Angeles
Posts: 3,239
|
To me, that looks like a piece of PEX coming out of the camper, not vinyl tubing. It's white, a bit thick, and the band clamp that's holding it onto the valve is commonly used with PEX, similar to what Bill posted a picture of. It would be easy to tell -- a piece of vinyl tubing, even with age, would still allow that valve to wiggle side to side. PEX would not.
What I'd do is try to just get that band loose. Sometimes it's fastened on there by the 2 ends of the clamp latching onto each other, and even then pressed into each other. If so, you might be able to break that connection loose with some needle nose pliers, and the band will then just peel off. If the band has a bulge protruding out from the tubing, like the one Bill has pictured, then just cut the bulge with some heavy wire cutters or something similar.
After the band is off, if that is indeed PEX coming from the camper to the valve, that is more than likely the water heater drain. Easy to verify just by looking under the sink (and would be consistent with PEX coming through the floor to that valve). And if that's the case, then draining hot water from the water heater through that line will soften up the PEX enough to just pull that valve right off.
As to a new valve, I would use a "Flair-It" fitting -- something that looks like this (not sure if this one is the right size:
https://www.amazon.com/Flair-16892-P.../dp/B000BQT694
These simply slip into a piece of pre-warmed PEX, and then the compression nut tightens the PEX over the fitting. Easy to remove, too. They work great, and it looks like there's some sort of Flair-It fitting below your valve. What is that?
Alternatively, you could use some sort of Shark-Bite type valve. Plastic would probably be preferable in that location. Something like this (again, I have no idea if this is the right size):
https://www.amazon.com/Speedfit-Conn.../dp/B003YKF2F6
These would be slightly easier to install vs. a Flair-It, but probably slightly more difficult to remove because you'd have to get a tool in between the camper and the valve to remove it. There are some small tools, but you'd also need to be applying downward pressure on the valve towards the ground to remove it.
Dave
__________________
2000 2720SL & 2007 3124KB
2005 Toyota Sequoia
Twin Battle Born 12v 100Ah LiFePO4 (BBGC2) batteries, 300W solar on rear shell, Link 10, Lift kit, Maxxis 8008 225 75/R15 E tires
|
|
|
|
|
03-12-2024, 02:39 PM
|
#10
|
|
Site Team
Join Date: Feb 2003
Location: The mountains of Scottsdale, AZ, and the beaches of Maine
Posts: 10,104
|
Dave -
I was unaware of the Flair-It fitting, and it looks like a good solution even if the pipe is PEX. Thanks for pointing it out to me.
Kevin -
As you pointed out, and has already been said, the first challenge is to get the leaky valve off. Then, you have to hope that the end of the pipe is square and undamaged, and that it is either PEX or PVC. And finally you have to hope that the end of the pipe protrudes far enough out of the big sleeve that you can put a tool on the Flair-It fitting's knurled nut to tighten it.
Fortunately, if you buy a Flair-It fitting and the above conditions are not met, the fitting will still be part of your solution. No waste.
Bill
|
|
|
|
|
|
|
Currently Active Users Viewing This Thread: 1 (0 members and 1 guests)
|
|
|
 Posting Rules
|
You may not post new threads
You may not post replies
You may not post attachments
You may not edit your posts
HTML code is Off
|
|
|
|
 » Recent Threads
 |
|
|
|
|
|
|
|
|
|
|
|
|
|
|
|
|
|
|
|
|
|
|
|
|
|


 Linear Mode
