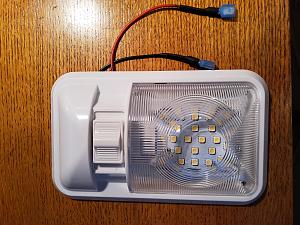
I received 8 Kohree 12 V LED RV Ceiling Dome Lights. The first thing I noticed was the glare. 12 Little LED's just above eye level with a not-so-great diffuser (in my opinion) isn't easy on the eyes. But, a lot of people seem to like this glare. Part of it is the low ceiling of a Trailmanor, though.
The second thing about these lights is that they have a switch with two "on" positions and "off". (is that double pole, triple throw? I was never taught that, so that's the best I can figure. You'll see a picture here anyway.) So, why not wire in a resistor to make the 2nd on position dimmer for a night light? So here we go.
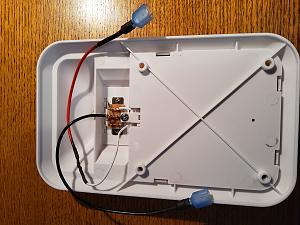
I upgraded the wiring as much as reasonable so that I could use crimp connectors as shown. This saves on soldering to the main wiring, and allows the lights to be removed easily if necessary, in the future. These crimp connectors are much better than the type of splice connector manufacturers use.
I wired a 550 ohm resistor into two of the lights, a 650 ohm resistor into a second set. This way, we could turn a light on in the middle of the night without waking everyone up. Or we could leave one on as a night light.
I heard that you can use wax paper inside the lens as a diffuser. 12V LEDs are cool so there's no danger of heat. Still, I'm not a fan of putting anything flammable near anything electrical, even if it is 12 V and low heat. So I'm still trying to think of a better diffuser.
I already wired in one, but I used a 30 ohm resistor. At first, it seemed to be about right, but when I installed it, it was just barely dimmer. I'll keep it in for now, it's the one over the stove.
In wiring, I did solder to the switch of course, and I also soldered the one splice you see there. I used heat shrink around the crimp connectors and splice. This I consider to be the bare minimum for quality. I know there are some electrical engineers on this site who would have done it a little differently, but this wiring is better than what many commercial maintenance would have done.


 Linear Mode


