|
|
 05-22-2005, 12:10 PM
|
#11
|
|
TrailManor Master
Join Date: Sep 2004
Location: NW OHIO
Posts: 267
|
Factory dead bolt
__________________
PREVIOUS ONWNER OF A 2004 3023 Trailmanor 2004 1500 Dodge Ram Quad Cab Timbren SES and Supersprings 4-Rancho RS9000X shocks 3 inch front lift kit Drawtite front hitch Valley Odyssey brake controller
:new_evil: R. V. THERE YET! New 2007 Outback Sydney 31RQS 2006 2500 Heavy Duty 4x4 Quad Cab Cummins Diesel CTD
|

|

|
|
05-22-2005, 01:17 PM
|
#12
|
|
Site Team
Join Date: Feb 2003
Location: The mountains of Scottsdale, AZ, and the beaches of Maine
Posts: 10,097
|
A bit of good news - from the factory, the door lock and the deadbolt are keyed alike. And the deadbolt looks like a common item from Home Depot etc. So if you plan to add a deadbolt, you can have the lock guy at Home Depot set it to your existing key for only a couple bucks more - cheaper than making extra copies of the keys that come with the lock.
Bill
|
|
|
|
|
05-24-2005, 06:56 PM
|
#13
|
|
Guest
|
 My Interior Slide Bolt
As I mentioned previously, I planned to mount a slide bolt on the inside of my TM's upper door for additional security when my wife and I are inside our trailer at night. My installation method required that I fabricate a "stud plate" with four 10-32 studs on the same centers as the holes in my 4" slide bolt. I made the plate from scrap 0.10" thick steel sheet, then drilled the holes and tapped them with 10-32 threads. I cut my studs to the desired lengths from 2-1/2" long, 10-32 machine screws and brazed each one in its threaded hole. After sanding the studs' slight protrusions on the plate's outside surface flush with the surface and painting the plate, it was ready for use. The first photo shows the stud plate along with a 1/4" thick aluminum spacer plate that I made to fit under the slide bolt. I used the wooden block template that's shown to drill my four holes through the door. The finished slide bolt installation is shown in the final two photos. I may install a 1/16" thick rubbing plate on the door's frame so that the bolt won't wear down its thin sheet metal framework. I'm considering having a nameplate made and cementing it to the outside surface of the stud plate. It seems to beg for one.
|
|
|
|
|
05-25-2005, 07:25 PM
|
#14
|
|
Guest
|
Outside Lock for Upper Door Half
Larry -
Your inside lock looks great. We all appreciate your detailed explanation of how you make and install improvements.
I ordered and tried to install the cam lock you installed on your TM. My cam lock came today via UPS. I gather the tools and the lock and prepared to install it. I took time to get the proper placement and then decided to drill a starter hole (1/8th bit) from the inside. To my great suprise after the drill went through the metal, the bit hit empty space.
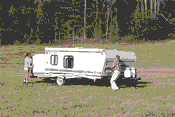
To make a long story short, after 4 or 5 test holes, I found that my TM upper door does not have a wood core between the metal (at least from the bottom up to 15 inches up the door). I was suprised about this because the upper right hand of the door had does have a wooden core (see the picture I posted earlier showing inside latch I installed). I expected the lower part of the upper door also would have a wooden core -- it doesn't.
BTW, on our TM, the latch installed by TM (to hold the upper and lower doors together) does not go through a wooden core. In my mind, this makes the door less secure than I originally thought. Our TM is a 2619, 2003. I wonder if all TMs of this year were made without wooden cores in the lower part of the upper door.
We are leaving tomorrow morning for a 5 day trip with our TM. If anyone comes up with an answer on how to install this cam lock without having a wooden core (seems to me that without a wooden core, tightening the nut on the lock would bend the metal in on the door and the door would be less secure than it would if it had a wooden core), please let me know. We'll be back from our trip next Monday - I'll attempt to give it another try then.
Russ
|
|
|
|
|
06-03-2005, 03:13 PM
|
#15
|
|
Guest
|
Some Suggestions
Russ, have you installed the cabinet lock on your door? If you're still pondering what to do about the lack of a solid frame in the area where the lock should be installed, I have some suggestions for you.
The first is to consider injecting foam into the space between the inside and outside aluminum skins. I think that the nonexpanding foam is denser after it's solidified than the expanding foam but am not certain. Examine the labels on both types of canned foam to select the denser of the two types. Drill or saw (with hole saw) the approx. 3/4" dia. holes through both skins in the proper location. Then determine how large a void there is between the aluminum skins in this area. If it's extremely large (doubtful), you might find it necessary to feed in a length of some kind of material to create a roughly circular dam centered around the hole - even wadded up paper would suffice. Tape down a piece of cardboard over one of the 3/4" dia. holes. Inject the foam through the hole on the opposite side, being sure to angle the can's nozzle so that the foam is directed around the periphery of the hole. When the foam is solidified, trim away the foam that filled the holes. Finally install your cabinet lock.
My second suggestion involves fabricating a 1" thick filler block out of exterior-grade plywood (two 1/2" thick pieces of plywood can be laminated together to produce the 1" thickness). The block can be in the shape of a rectangle, approximately 2" x 2", for example. Enlarge the 3/4" hole in the inside aluminum skin so that the block can be inserted from the inside of the door - but be sure to leave a slight lip near the edge of the door. Temporarily fit the block in place and pencil in the location of the 3/4" hole by tracing its outline in the outside aluminum skin. Remove the block and drill the 3/4" hole in the block. Clean the inner surface of the outer skin by light sanding and wipe off with tissue or a clean rag moistened with solvent such as rubbing alcohol or paint thinner. Then glue the filler block in place so that the 3/4" holes are aligned. Make a plate to cover over the rectangular, inside hole out of a suitable material. This could be made from 1/8" thick aluminum sheet or 1/16 thick mild steel. This plate should have a 3/4" dia. hole that will align with the hole in the filler block. The plate should overlap all sides of the cutout/enlarged hole. Glue the cover plate to the sides of the enlarged hole and to the filler block. You can also screw the cover plate to the filler block with several round head wood screws. Paint the cover plate with a finish that matches the existing finish on the inside of the door and mount the cabinet lock. This would be my preferred way of installing the lock (it's a stronger installation) if I were faced with your situation.
|
|
|
|
|
09-25-2005, 05:22 PM
|
#16
|
|
Guest
|
Quote:
|
Originally Posted by Larry_Loo
Would someone whose TM has a factory-installed deadbolt please post a photo of it. Thanks.
|
We just took delivery of our 2006/3023. The deadbolt looks just like the ones we have on our home--except that they are single keyed. On our home we use double keyed due to glass near the deadbolt.
|
|
|
|
|
10-01-2005, 07:21 AM
|
#17
|
|
Guest
|
Darn, I knew there was another photo I was supposed to take! I will take one next time we go to where we have the TM stored. I think the main reason it is not installed on the upper half is the intrusion by the inside knob. Although is is only 1-2 inches (just a throw switch really, I think it would present a problem when you close the TM forward shell. I will have to look closer and see what kind of clearance there is between the rear and forward shell side walls next time I close it down.
|
|
|
|
|
10-09-2005, 10:43 PM
|
#18
|
|
Guest
|
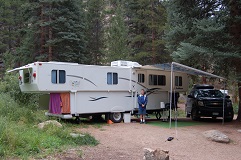
Photo of factory installed dead bolt
Larry, don't know if someone ever provided you a picture of a factory mounted deadbolt so took a shot of ours for you. Bill
|
|
|
|
|
03-17-2006, 11:35 AM
|
#19
|
|
Senior Member
Join Date: Mar 2005
Location: Carrollton, TX (Dallas suburb)
Posts: 245
|
Top door lock
I made a new lever lock to hold the door shut while traveling. The lever to hold the doors is now 1/2" longer. In the down position it holds the doors together, in the up position it holds the top door shut from the inside. The stainless on the jamb keeps the lock from vibrating down. This lock requires no extra holes!
__________________
Harry Womack
2005 3124KB, 200 watt solar
1750 watt 120 volt inverter
Maxxis load range E tires @ 75 PSI
2013 1500 Suburban Z71 5.3 4X4 w/
Firestone air bags inside of springs.
Not using Trail Manor now. Replaced
with 2020 motorhome
|
|
|
|
|
03-29-2006, 04:10 PM
|
#20
|
|
Guest
|
Harry,
What did you fabricate the latch from?
|
|
|
|
|
|
|
Currently Active Users Viewing This Thread: 1 (0 members and 1 guests)
|
|
|
| Thread Tools |
|
|
| Display Modes |
 Linear Mode Linear Mode
|
 Posting Rules
|
You may not post new threads
You may not post replies
You may not post attachments
You may not edit your posts
HTML code is Off
|
|
|
|
 » Recent Threads
 |
|
|
|
|
|
|
|
|
|
|
|
|
|
|
|
|
|
|
|
|
|
|
|
|
|