TrailManor Owner's Forum  

Go Back   TrailManor Owner's Forum > TrailManor Technical Discussions > General Maintenance and Cleaning
Register FAQ Members List Calendar

Reply
 
Thread Tools Display Modes
Old 06-04-2019, 01:02 PM   #1
Expanderoo
Senior Member
 
Join Date: May 2018
Location: Michigan
Posts: 80
Default Leaking roof vent

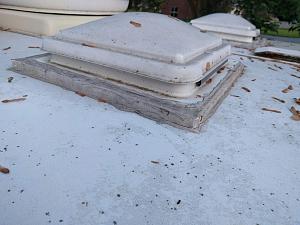
I recently purchased a 3124KB and we've had it setup in the driveway. Here in Michigan, we've had a bunch of heavy rain over the past week or so. I didn't find any leaks until two days ago when the curb side roof vent (without a fan) was dripping and there was a wet spot on the couch. I pulled down the inner trim and it seemed to be coming through the roof from the vent. I checked the vent up on the roof and the caulking looked old/cracked to me:

Click image for larger version

Name:	IMG_20190603_205307.jpg
Views:	71
Size:	1.73 MB
ID:	18293

Although it looks like it might rain here, I decided to start on the job:

Click image for larger version

Name:	IMG_20190604_124425.jpg
Views:	68
Size:	912.3 KB
ID:	18292
Click image for larger version

Name:	IMG_20190604_124428.jpg
Views:	73
Size:	306.4 KB
ID:	18291

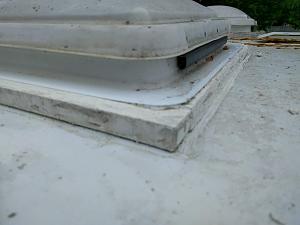
I now understand what "riser boards" are. To spell it out, if you're unsure like I was, the material between the vent bottom and the roof is the riser board. Named because they are raising the vent up from the roof surface. Why are we raising the vent? Is it because there is a minimum distance and raising up the vent ensures we meet the minimum so the inside garnish (or visible trim from below) is the right height?

Now that I understand how it all goes together, my questions are:
  1. Do I use butyl tape between the bottom of the riser boards and the roof?
  2. Can I use 3M 4000 as the caulk on the edges of the riser board (riser board to roof junction) and the bottom of the upper vent to riser board area?

Butyl Tape?

So between the bottom of the riser boards and the roof, should I attempt to use butyl tape? I realize it's typically used where there is more compressive force applied by screws but I don't know yet if the PVC riser boards are actually screwed to the roof or if instead they are held in place by the four screws holding the two vent halves together (the exterior part of the vent and the interior part of the vent).

Which caulk? 3M 4000? Manus Bond 75-AM (is it even a caulk)?

I read a bunch about caulk and jumped between Dicor/Sikaflex, 3M 4000/4200/5200 and Manus Bond 75-AM. I quickly ruled out 5200 as obviously one needs to redo vent caulking in the future and it is not intended for things that need to be removed/redone. I then read some more about 4200 versus 4000 and concluded 4000 is likely the better choice due to increase UV resistance (useful on a roof). That said, it's newer so those in the know are probably less likely to suggest it as it's not tried and true? Then I looked into Manus Bond 75-AM which TrailManor apparently uses to attach the trim to the corners of the shells. Can Manus Bond 75-AM be used as a caulk too? Or should it only be used as an adhesive? Can Manus Bond 75-AM be used to attach trim (say the rubber rub strip around the bottom of the TrailManor exterior)?

Surface Preparation - Unknown Prior Caulks (including silicone)

While removing the old caulk, I noticed there was at least some silicone in various places. Mostly between the riser boards and the upper vent foot. From prior threads, I understand I should use acetone to clean the surfaces (after I get them as clean as possible without it) and only apply it with a cloth as it will eat the foam if it comes in contact with it. So I will do that -- stating this in case there is more I should be doing.

Motivation

The reason I'm going at this a bit heavy handed is I have a driveway to work in and we're not using the trailer yet. Our plan is to use it full time for at least a month if not longer. Looking at the caulking on the other vents, I think it would be best to do the other two. I also noticed the air conditioner base has some caulk applied in the front of the junction between the roof and the base. My understanding is that it uses a compressed foam gasket that can degrade over time. Do you think I should replace this gasket too? I'm mulling over how to most easily raise the AC unit off the TrailManor.
Expanderoo is offline   Reply With Quote
Old 06-04-2019, 01:05 PM   #2
Expanderoo
Senior Member
 
Join Date: May 2018
Location: Michigan
Posts: 80
Default

One other question I had was what are the odds it's not actually leaking at the roof vent and is instead leaking from another area? I noticed this while up on the roof:

Click image for larger version

Name:	IMG_20190604_124435.jpg
Views:	70
Size:	1.09 MB
ID:	18294

I clearly need to check and redo all the caulk (read some helpful posts on that topic). I think the water was coming through the vent but I didn't take the garnish off until the next day so I didn't directly see it coming from the top roof area down. I realize the water can travel inside the roof panel but with the curve of the roof, I'm guessing it would go down another way not to the vent. But I figured I'd ask.
Expanderoo is offline   Reply With Quote
Old 06-04-2019, 04:07 PM   #3
Expanderoo
Senior Member
 
Join Date: May 2018
Location: Michigan
Posts: 80
Default

I found this thread:

Mystery of Leaking Front Left Roof Vent Solved

And it answered some of my questions. I'm still curious what I can use Manus Bond 75-AM for (if it can be used instead of 3M 4000/4200 or be used to adhere the rubber rub strip).
Expanderoo is offline   Reply With Quote
Old 06-04-2019, 05:05 PM   #4
FlyboyTR
Senior Member
 
FlyboyTR's Avatar
 
Join Date: Mar 2019
Location: Mobile, AL
Posts: 225
Default

Expanderoo.... (love your handle...)

The foam gasket for the A/C has nothing to do with the riser box it is sitting on. That gasket sits between the a/c frame and the top of the box. That is something that does require a wee bit of tightening the 4 large corner (attachment) bolts (remove the inside plastic cover to see them). It is also prudent to replace said gasket. The problem is, the A/C unit has to be lifted up, site cleaned, gasket placed and the unit repositioned and the bolts lightly snugged down.

We've had an Allegro Bus for 23 years, plus other conventional campers and such. I am a big believer in Dicor and Eternabond Tape...just me...lots of products will do a good job since we're not dealing with a rubber roof. Just ALWAYS....say NO to silicone! That stuff is the death of many RV's...plus it has to be completely removed before a quality product can be used.

Sounds like you're headed in the right direction! Good luck!
__________________
2007 Trailmanor 2720 SL (new to us 04/19) SOLD.
2010 Trailmanor 3023 (new to us 08/2022...The "Rat Motel")
FlyboyTR is offline   Reply With Quote
Old 06-05-2019, 09:30 AM   #5
Expanderoo
Senior Member
 
Join Date: May 2018
Location: Michigan
Posts: 80
Default

We had some more (relatively light) rain and today I found some water drops and a tiny puddle under the front street side of the fantastic fan trim. I took off the trim and couldn't figure out where the water was coming from.

After feeling around, I realized it appears to be coming from between the two metal sheets that make up the lower part of the ceiling. The roof sandwhich is basically:

Code:
metal sheet
metal sheet
foam
metal sheet
metal sheet
So I think I'm seeing:

Code:
metal sheet
metal sheet
foam
metal sheet
(water/dampness here)
metal sheet
So it's wicking around in the sheeting. Based on other threads, and seeing how robust the caulking as on the vent I am removing, I wouldn't be surprised if the water is actually coming in from the center seam in the top of the front shell.

I also removed the trim around the AC unit and observed the PVC boards used in supporting it have cracks. I felt no moisture there but I'm going to leave all the trim off and observe when it rains (or get the hose out if it doesn't rain today).
Expanderoo is offline   Reply With Quote
Old 06-05-2019, 09:35 AM   #6
Expanderoo
Senior Member
 
Join Date: May 2018
Location: Michigan
Posts: 80
Default

@FlyboyTR Thanks for explaining how the AC mounts. I wonder if someone cranked down those bolts too tight and the PVC riser boards cracked or if it just normal wear and tear due to the way it is mounted.

I'm reading the threads about sealing the center seam on the top of the roof and based on what I've read so far, Eternabond tape seems like a good solution to that problem. I can't quite read between the lines on the people who don't like it and the people that do. It seems like the complaints are mostly aesthetics along with maybe it being new (so not traditional)? But the properties of Eternabond tape sound ideal for that center seam given how the seam can flex and crack caulk.
Expanderoo is offline   Reply With Quote
Old 06-05-2019, 09:43 AM   #7
Bill
Site Team
 
Bill's Avatar
 
Join Date: Feb 2003
Location: The mountains of Scottsdale, AZ, and the beaches of Maine
Posts: 10,104
Default

Although it seems unlikely, based on the location where you see the water, it is possible that water is coming in through the crank-up TV antenna. The caulking under this thing is prone to failure, which is easily visible. What is not so visible is that you are supposed to drop some oil down the central shaft (I think that's where it goes). Take a look at the Owner's Manual, either in hand or online, to confirm.

Bill
__________________
2020 2720QS (aka 2720SL)
2014 Ford F-150 4WD 5.0L
Bill's Tech Stuff album
Bill is offline   Reply With Quote
Old 06-05-2019, 10:08 AM   #8
Expanderoo
Senior Member
 
Join Date: May 2018
Location: Michigan
Posts: 80
Default

Update: I found a big leak on the fan vent. So my theory about water wicking is fine but it might be wrong. Or it might be partly right. But I put a hose on the roof like so:

Click image for larger version

Name:	IMG_20190605_115419.jpg
Views:	68
Size:	918.5 KB
ID:	18297

And I got a nice steady drip/stream of water coming in from the front street side of the riser boards:

Click image for larger version

Name:	IMG_20190605_115507.jpg
Views:	72
Size:	425.8 KB
ID:	18298

Enhance (I edited to add this and somehow the image is much smaller but at least it'll load fast if you click to see the bigger version):

Name:  fan vent front street corner leak.jpg
Views: 128
Size:  11.7 KB

I looked closer with my eyes and observed a dark brown area in the riser board that appears to be the source of the leak. This is very similar to another thread here with the exact same leak. I noticed my riser boards are stapled together and I suspect there is going to be a staple responsible for where it cracked.

What about the first leak?

Yeah, that is my concern too. I do wonder if perhaps the water was wicking from the fan vent leak downhill to the curbside vent and leaking there. I am going to look very carefully for brown water stains on that non-fan vent to see if there is an obvious leak path there.
Expanderoo is offline   Reply With Quote
Old 06-05-2019, 10:16 AM   #9
FlyboyTR
Senior Member
 
FlyboyTR's Avatar
 
Join Date: Mar 2019
Location: Mobile, AL
Posts: 225
Default

Eternabond tape has been around for years. Most of the time when people have a problem, other than aesthetics, it is due to an adhesion problem. The surface must be clean and dry. Any silicone residue is the death...it will NOT stick. Also cleaning the area with alcohol, paint thinner, etc is a good thing...but caution must be used to make sure you're not damaging the finish. I have never had a failure using this product. If the surface is cleaned...the tape is not coming up! Put it exactly where you want it...the first time cause there ain't no redoing it!

I personally like to apply Eternabond tape when the weather is hot. You do not want to stretch it, but the initial grab is stronger and more flexible if working around vents and such.

It is very possible, and easy, to over-tighten the AC hold-down bolts. I doubt that would have caused the riser to crack...but...hard to say! Also depends on where the cracks are!

Quote:
Originally Posted by Expanderoo View Post
@FlyboyTR Thanks for explaining how the AC mounts. I wonder if someone cranked down those bolts too tight and the PVC riser boards cracked or if it just normal wear and tear due to the way it is mounted.

I'm reading the threads about sealing the center seam on the top of the roof and based on what I've read so far, Eternabond tape seems like a good solution to that problem. I can't quite read between the lines on the people who don't like it and the people that do. It seems like the complaints are mostly aesthetics along with maybe it being new (so not traditional)? But the properties of Eternabond tape sound ideal for that center seam given how the seam can flex and crack caulk.
__________________
2007 Trailmanor 2720 SL (new to us 04/19) SOLD.
2010 Trailmanor 3023 (new to us 08/2022...The "Rat Motel")
FlyboyTR is offline   Reply With Quote
Old 06-05-2019, 10:37 AM   #10
FlyboyTR
Senior Member
 
FlyboyTR's Avatar
 
Join Date: Mar 2019
Location: Mobile, AL
Posts: 225
Default

I recently had a leak in the right side vent. I had done some touch up caulking right after buying the TM (since I was leaving in two weeks for an almost 4 week trip). But...I still had a leak that showed up in the lower corner of the vent. Last week I was able to work on this. I was convinced in was coming from the center seam.

Water testing... I like water testing but I like to do it slowly with a tiny spray and no force. I typically start at he lowest point and spray part of a seam or one side of a vent, etc. In finding my leak I had already learned that it showed up quickly. So in my controlled environment I sprayed water on the roof (from the ground and with 15 seconds it was pouring out the vent. OK, large opening. After stopping the water the drip stopped within a minute! So I started at the lower edge of the vent against the roof, no joy, moved to a different side, no joy. After all for sides were checked against the roof, I move upward on the vent. When checking the last side...Kathy let me know that water was pouring! Yea! Turned out there was a 6" crack in the housing (horizontal surface) right against the caulk line! It was one of those cracks that you can't see...until you know exactly where to look and where to push at the same time.

I cleaned the area appropriately and used a razor knife to smooth down some humps and lumps along the caulked seam. I cut a piece of Eternabond tape to length, removed the backer and applied it, trimmed and folded the ends and then slowly applied pressure so that I knew it had a bond to everything. After a couple of hours I checked it and then turned on the water. Eternabond to the rescue!

I would suggest doing slow and gentle water testing starting at the lowest point. If water is flowing everywhere...you still don't know where the leak is!

Sorry to ramble on so long. Good luck!
__________________
2007 Trailmanor 2720 SL (new to us 04/19) SOLD.
2010 Trailmanor 3023 (new to us 08/2022...The "Rat Motel")
FlyboyTR is offline   Reply With Quote
Reply


Currently Active Users Viewing This Thread: 1 (0 members and 1 guests)
 

Posting Rules
You may not post new threads
You may not post replies
You may not post attachments
You may not edit your posts

BB code is On
Smilies are On
[IMG] code is On
HTML code is Off

Forum Jump

Similar Threads
Thread Thread Starter Forum Replies Last Post
Instrall a vent cover over the fantastic roof vent? jap1935 Exterior 3 09-11-2018 08:36 PM
Mystery of Leaking Front Left Roof Vent Solved Steppy Exterior 5 05-17-2018 07:16 AM
Roof Vent Leak Randy Exterior 9 10-10-2014 12:07 PM
2005 TM roof skylights and vent leaking. coralcrazed Interior 1 04-25-2011 07:54 AM
Roof Vent Cushion or Solar Cover Allen1124 How to and Modifications 1 03-10-2008 08:51 PM


All times are GMT -6. The time now is 02:31 AM.


Powered by vBulletin® Version 3.8.11
Copyright ©2000 - 2024, vBulletin Solutions Inc.
Copyright 2022 Trailmanor Owners Page.