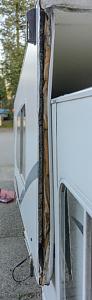
There had been a request once for some pictures of the bag seal replacement along the vertical edge of a shell. I believe it was specifically directed to replacing the wood backing behind the shell.
I had mulled over the possibility of using vinyl wood, but the polyurethane glue expands into the pores of the wood, and there are no pores in vinyl wood. My options were to use a different glue, or go with treated wood. When I couldn't even find vinyl wood locally with dimensions even big enough for me to cut to size (all were 7/8" wide, you need 1"), that made the decision for me and I went with treated wood.
I needed to cut the wood to exactly 1"x1.5". I used treated wood, but used about 3 coats of water based end cut sealer on all surfaces.
Bag seal removal (partial)
First picture shows the bag seal removed, well removed enough to replace the wood. You'd have to raise the shell a little more and remove all the staples from the side before you'd be able to remove the seal completely. My seal is still in pretty good shape, I just need to replace the wood. Removal is pretty obvious and straight forward.
You do need to peel back the outer aluminum skin. I used slip joint pliers with a block of wood on the outside surface so that the aluminum skin would flatten against the wood instead of just bend out. You do not need to peel the skin back completely straight. There is enough flexibility in the skin that you can insert the new wood even if the skin is still bend inwards a little. Be very careful, though. TM doesn't cut these edges nicely! (Maybe the new factory does, but I doubt they'd take the time where cosmetics don't count.
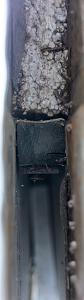
 Pocket stop exposed
This picture is of interest only. This is an aluminum framed trailer, but the pocket stop in another picture that I have posted in this forum somewhere shows metal. This view shows that behind the metal is wood. Bill had said that there was likely wood behind the metal. There is the wood.
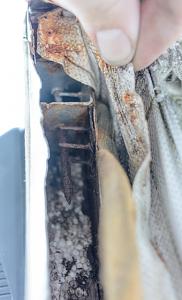
 Hidden Screw!
Fortunately, the wood was completely rotted, so I didn't have to figure out how to deal with this screw when removing the wood. Nature took care of that for me. However, this upper screw was inserted before the roof was installed. Now that the roof is installed, you cannot get access to this screw. I show how to deal with installation around this screw next.
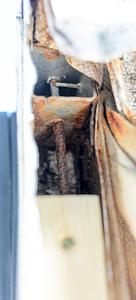
 Dealing with top screw
I used a short scrap of wood from the stock I cut to replace the wood backing to locate where the screw would be in the end of the wood. I could then transfer the screw mark to the actual wood strip I would be inserting into the shell. I drilled a hole a little larger than the screw and packed it with an epoxy/sawdust mix. When the wood strip gets inserted, the epoxy/wood mix will form solidly around the screw.
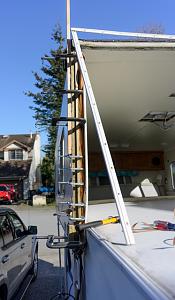
 Gluing and clamping
Polyurethane glue (Original Gorilla glue) expands as it cures, and is water activated. I coated all the surfaces of the wood and aluminum with more water based end-cut sealer. I was then able to position the wood strip into place, and clamp. Clamping time is supposed to be 1-2 hours, so I should be able to remove the clamps by nightfall.


 Linear Mode


