 |
|
 03-24-2018, 09:25 AM
|
#1
|
|
Senior Member
Join Date: Feb 2013
Posts: 91
|
 Backed into my TM with my truck
I'm thinking maybe this has happened to someone else who might share some insight. Yep, got in a crazy hurry one day and back into the top left forward-most section of the upper shell of my 2619 TM stored in my driveway. There's a small dent and separation (gap) between front and side aluminum. The damage looks minor and I think I can repair it myself by straightening the metal (best I can) and installing a new weatherstrip, which I've ordered from TM.
But it occurs to me there may be damage I can't see (have not had the chance to open it up). Has this happened to anyone, and do you have any advice ? Auto body shop wants $850 which is fine but if I can I'd like to repair it myself.
Thank you.
|

|

|
|
03-24-2018, 11:07 AM
|
#2
|
|
Site Sponsor
Join Date: Mar 2013
Posts: 1,041
|
If you can, could you post some pictures. It would give us a better idea how bad of damage with better responses.
__________________
2013 2619
80 watt solar panel/swing hitch/low profile A/C.
Enduro 4445 caravan mover
2016 Dodge Ram 1500 V8 Hemi
Installed powered folding tow mirrors
Stopped playing with airplanes, now I just enjoy watching them fly by.
|

|
|
|
03-24-2018, 11:09 AM
|
#3
|
|
Site Team
Join Date: Feb 2003
Location: The mountains of Scottsdale, AZ, and the beaches of Maine
Posts: 10,104
|
Quote:
|
There's a small ... separation (gap) between front and side aluminum ...
|
You need to remove the plastic molding that wraps around the front-panel to side-panel joint on the shell, so you can see underneath it. Among other things, you will see the heads of some reasonably big bolts. These are what attach the front panel to the side panel. Make sure that these bolts have not pulled loose. If they have not, all is well and you can continue with the fix. If they have pulled loose, the threads in the aluminum frame members have probably stripped out, and you will have to remove the bolts and substitute the next larger size.
Bottom line - it is important that the two panels are securely attached to each other. If they are even a little loose, the joint will continue to open up, causing leaks and more damage.
Bill
|
|
|
|
|
03-24-2018, 12:37 PM
|
#4
|
|
Senior Member
Join Date: Feb 2013
Posts: 91
|
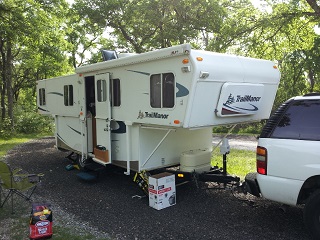
Thank you Bill, great information. Pictures attached - these are either side of the impact point. The weatherstrip is cracked so I've ordered a new one from TM but of course I ordered the wrong side...
|
|
|
|
|
03-24-2018, 05:20 PM
|
#5
|
|
Site Team
Join Date: Feb 2003
Location: The mountains of Scottsdale, AZ, and the beaches of Maine
Posts: 10,104
|
That is much less damage than I envisioned. I don't think you are in trouble at all. And I can't imagine how a body shop could estimate $850.
If you are going to remove that piece of trim anyway, you will have a good opportunity to reform the sheet metal. You can bend it with your fingers, or press it into shape with a round steel rod or a wood dowel. I don't think you would want to tap it with a hammer. The aluminum is awfully soft. And take a quick look at the bolts at the same time, just to be sure.
The bad news is that the trim strip is a devil to remove. It is held in place with great globs of some kind of adhesive, and behind that are more great globs of randomly-placed sealant. You will want to remove the original caulk and clean it up well. Then trim the globs of adhesive, at least to the point where the new trim strip fits nicely into place. You may need to remove the old adhesive, unless you can find a new adhesive that will stick to the old.
In the process of removing the existing trim strip, you will break it - I say that from experience. Since you are replacing it, you don't really care, which is nice.
Then you need to adhere the new trim strip with more great globs of adhesive, and tape it firmly in place with many strips of masking tape, to prevent the trim strip from squirming on the soft adhesive. I suggest you don't start this part of the job until you have time to finish it. Then, when the adhesive has set up, do a normal caulk job along the edges.
Let us know your experience.
Bill
|
|
|
|
|
03-24-2018, 06:45 PM
|
#6
|
|
TrailManor Master
Join Date: Aug 2015
Location: Rochester, NY
Posts: 1,836
|
If I can add to Bill’s tutorial, I would also seal the edges where the roof/front and wall meet with Eternabond tape underneath the trim pieces. Even better, use 2 sided Eternabond to help stick the trim piece back on.
__________________
2007/21 TM 3326 (Pride of the Fleet)
2000 2720SL (Rebuild Project)
2002 2619 (Parts TM)
SMARTER THAN GOOGLE!
|
|
|
|
|
03-24-2018, 06:56 PM
|
#7
|
|
Site Team
Join Date: Feb 2003
Location: The mountains of Scottsdale, AZ, and the beaches of Maine
Posts: 10,104
|
Love it, Shane. Thanks.
Bill
|
|
|
|
|
03-25-2018, 09:26 AM
|
#8
|
|
Senior Member
Join Date: Feb 2013
Posts: 91
|
Thanks so much guys very reassuring and helpful. Exactly the kind of info I was hoping for. You probably saved me $850 so, where should I send your six-packs? 
I'll post the results.
oh and getting the existing trim off - I understand its a chore - what's the best method ? Hesitate to use a putty knife or similar, don't want to scrape the aluminum. Would heat help at all ?
Thanks !
|
|
|
|
|
03-25-2018, 10:27 AM
|
#9
|
|
TrailManor Master
Join Date: Aug 2015
Location: Rochester, NY
Posts: 1,836
|
I have a theory, and it’s just a theory, about getting the trim piece off. What if you could get a piece of steel wire under the bottom edge of the trim piece, and use it like a saw to cut through the silicone? Think like a “flossing” motion...
The street side front trim piece on my TM is cracked in several places. The curb side doesn’t look so great, either. I have replacement trim pieces, just haven’t had time to R&R them...
__________________
2007/21 TM 3326 (Pride of the Fleet)
2000 2720SL (Rebuild Project)
2002 2619 (Parts TM)
SMARTER THAN GOOGLE!
|
|
|
|
|
03-25-2018, 10:48 AM
|
#10
|
|
Site Team
Join Date: Feb 2003
Location: The mountains of Scottsdale, AZ, and the beaches of Maine
Posts: 10,104
|
Quote:
|
What if you could get a piece of steel wire under the bottom edge of the trim piece, and use it like a saw to cut through the silicone? Think like a “flossing” motion...
|
Shane -
Interesting thought. You would need to protect the adjacent surfaces in the visible areas. Duct tape ought to do it. Of more concern is the fact that the wire will try to go straight across the corner under the curved contour of the trim. If it snags the aluminum surface, it will start to cut much deeper than you have in mind.
As I say, it is an interesting idea. ChillEDog, if you try it, let us know how it works.
I don't know if heat would help with the removal. Again, if you try it, let us know. I found that the problem with a putty knife is that it is a Push tool. It is sometimes easier to control a Pull tool, like a linoleum knife.
Bill
|
|
|
|
|
|
|
Currently Active Users Viewing This Thread: 1 (0 members and 1 guests)
|
|
|
 Posting Rules
|
You may not post new threads
You may not post replies
You may not post attachments
You may not edit your posts
HTML code is Off
|
|
|
|
 » Recent Threads
 |
|
|
|
|
|
|
|
|
|
|
|
|
|
|
|
|
|
|
|
|
|
|
|
|
|


 Linear Mode
