 |
|
 09-17-2018, 05:15 PM
|
#1
|
|
Member
Join Date: Jun 2018
Location: Huntsville, AL
Posts: 36
|
 Corner Seperation
Here are some pictures to better explain the issue I have with my rear shell. It take an good deal of oomph to get the rear shell up (A/C on top) and the repeated "yanking" has made the rear wall pull away from the side walls. The biggest problem is on the street side (pic 2), although from the amount of built up caulk on the curb side, I imagine it is suffering too. (picture 1)
The wood holding th bag seal in place is broken into 4 or 5 pieces inside (pic 4), I am not sure if this has anything to do with things or not. There is more black mildoew stuff in the affected corner than the other, (pic 5)
Also, when I lowered the shells Saturday, about 1 cup of water poured from the lower corner (pic 3), I don't think it is supposed to be a weep hole. The water was clean and did not smell, so I do not think it had been there a long time.
I pulled the trip strip up a little to see what was what and not every hole had a screw in it, but it did have a shot of caulk. I am failrly sure I can tap the rear wall back over the side wall and recaulk, but it will only open up again when I open the shell.
Has anyone had this problem? Any reasonable fix? I really need something to provide additional connection between toh aft wall and the side walls, more than the area around the seam. A few "L" brackets would probably help, but put them inside or outside? the best think would be a handle or grab bar the runs across the outsde back wall that is attached to the side walls. Kills 2 birds with 1 stone as I could really use a stiff means of lifting back there anyway.
|

|

|
 09-17-2018, 06:57 PM
|
#2
|
|
Site Team
Join Date: Feb 2003
Location: The mountains of Scottsdale, AZ, and the beaches of Maine
Posts: 10,105
|
I can't speak directly to the back of the trailer, but I know that in the front shell, if you pull off the vertical corner molding where the front wall meets the sidewall, you can see the framing of both the front and side walls. On my 2006 TM (you didn't tell us the year of yours), the framing is square aluminum tubing, and the joint is held together with lag bolts through the side frame members and into the front frame (or is it the other way around?) If the lag bolts have stripped out their thread, you should be able to insert new bolts, same length, next larger diameter.
Bill
|

|

|
 09-17-2018, 07:21 PM
|
#3
|
|
Site Sponsor
Join Date: Nov 2016
Location: Vancouver BC
Posts: 1,520
|
I just finished a similar repair on mine. I took a few picture on the way that I can share with you.
|

|

|
 09-18-2018, 07:03 AM
|
#4
|
|
Member
Join Date: Jun 2018
Location: Huntsville, AL
Posts: 36
|
Bill- my bad, I have a 2001 3124. I believe the way my trim is different than yours based on previous posts. I do not have the end cap trim that covers the corners, just the screw down metal corner trim channel with an insert strip to cover the screws.
Larry- I would love to see what you did and a little explanation if possible. This is my last "big" issue for the moment and I can continue on to the clean up/dress up part of the reno.
Thanks all.
__________________
Kathi
2001 Trailmanor 3124 (in-work)
2016 Chevy Colorado z71
|

|

|
 09-18-2018, 07:37 AM
|
#5
|
|
Site Team
Join Date: Feb 2003
Location: The mountains of Scottsdale, AZ, and the beaches of Maine
Posts: 10,105
|
Quote:
Originally Posted by Cynical

Bill, I believe the way my trim is different than yours based on previous posts. I do not have the end cap trim that covers the corners, just the screw down metal corner trim channel with an insert strip to cover the screws.
|
Either way, you should be able to remove the trim so that you can see the actual joinery that attaches the walls to each other.
My query re the year of your TM was not intended to discover the nature of the trim. Instead, I wanted to find out if trailer has aluminum wall framing, or wood. By removing the corner trim, you can see it clearly, and also see what you need to do to re-join the walls.
I can't imagine that you can rejoin the walls without seeing the joinery, and that goes double for use of L-brackets. You need to screw an L-bracket into something, and whatever you screw into must be much more hefty than the thin aluminum skin.
Bill
|

|

|
 09-18-2018, 07:50 AM
|
#6
|
|
Member
Join Date: Jun 2018
Location: Huntsville, AL
Posts: 36
|
Got ya, I will be pulling the trim off after work tonight. I "think" I have aluminum framing, at least it appears that way. In the pocket stops, I have aluminum tube in the places Larry's pics showed.
I agree on the needing more bite than just the thin walls. The force of setting up the rear shell is going to continue to put stress on the area, so I was thinking some sort of rigid support bar spanning the entire back wall and attached to all 3 walls might be the best solution. Plus, I could make it a hand hold/handle to use during set up.
I will take more apart this evening and see what I can see, then post more.
__________________
Kathi
2001 Trailmanor 3124 (in-work)
2016 Chevy Colorado z71
|

|

|
 09-18-2018, 02:43 PM
|
#7
|
|
Site Team
Join Date: Feb 2003
Location: The mountains of Scottsdale, AZ, and the beaches of Maine
Posts: 10,105
|
Quote:
Originally Posted by Cynical

In the pocket stops, I have aluminum tube in the places Larry's pics showed.
|
Good! That eliminates a lot of potential problems.
The rigid support bar isn't a bad idea, providing you get it low enough open the compartment door.
Bill
|

|

|
 09-18-2018, 05:46 PM
|
#8
|
|
Member
Join Date: Jun 2018
Location: Huntsville, AL
Posts: 36
|
 Updated Research!
Ok, I see what is going on now, and I think I know where the cup of water came from Sat! I pulled the bottom edge trim and the corner trim back about 2 feet each. Confirmed, I have an aluminum frame, BONUS. It looks like the back wall frame is joined to the side wall with a secondary aluminum tube in between at the bottom curve. THAT piece of aluminum has separated (spelled it right this time) from the 1x4 in the side wall.(pic 1)
The inner channel should butt up against the side wall channel and the 1x as in (pic 2). It was a skinny rusted 1.5 - 2" screw, cant see how it held up at all, but the reality is, the wood is split in that spot (pic 3). The 1x looks nasty, but is not falling apart, should I plan on replacing it anyway? Any idea how far forward I will need to peel back the side wall to replace section? Should I use PT or pine or should it not matter?
Once the inner channel is secured to the side wall, the outer wall can be pushed into and secured to the inner channel and continue to the side wall channel further up the seam (pic 4).
The screws closest to the damages area were really rusted and not doing much, the others were gripping good, especially the further away from the lower corner I got. (pic 5)
I think my best bet would be to take the bottom trim off completely for the aft wall and lift the curbside corner moulding a good 2' like this side, I suspect I will find similar if not as bad. (pic 6)
After I get it repaired and back together, I think I will use "seal tite" on the seams before putting the trim back down.
Now for the FIX to keep it from happening again: I am thinking, maybe flat stock attached to the bottom of the side walls that protrude maybe 4" beyond the back wall. Bolt a 3/4-1" tube from flat stock to flat stock, creating a towel rack of sorts. Place 2-4 support bolts with fender washers through back wall to new bar as needed.
If anybody has any thoughts on my repair plan and words of wisdom, let me hear them, PLEASE. We are not supposed to get rain until maybe Friday so I may take Thursday off to do the repair and get it sealed back up. I can add the lift bar at anytime after the fact, shoudl I go that way.
__________________
Kathi
2001 Trailmanor 3124 (in-work)
2016 Chevy Colorado z71
|

|

|
 09-18-2018, 11:03 PM
|
#9
|
|
Site Sponsor
Join Date: Nov 2016
Location: Vancouver BC
Posts: 1,520
|

Sorry about the delay. Family life always makes life more interesting 
Now for the repair.
You must first understand the basic construction of the wall panels. They are basically an aluminum perimeter frame filled with Styrofoam and sandwiched between two thin sheets of aluminum skin. The are very light. You should not have to be pulling up on the rear shell much to lift it, so there should not be much stress on the rear or side walls when lifting shells. If you have to be using both hands and feel like you're doing a weight lifting routine, your torsion bars need adjustment. The torsion bars should be doing the lifting, not you.
If the rear wall has separated from the side wall, there is only one connection that has actually broken. That is, the rear vertical frame rail has separated from the lower frame rail. You can see this rear vertical frame rail pulled away in the image "Corner Damage A":
Corner Damage A
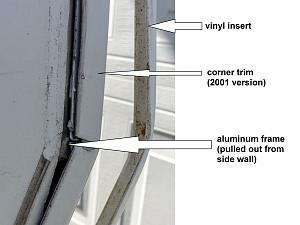
I had removed the vinyl insert only at this point. I could see the vertical frame rail was pulled out. So how was is held in place originally? There is only Styrofoam behind this frame rail, and the frame rail is not screws to the skin. The corner trim is what holds the skin to the frame rail. That leaves only one other location where the frame rail could be attached, and that is to the lower frame rail.
Corner Damage B
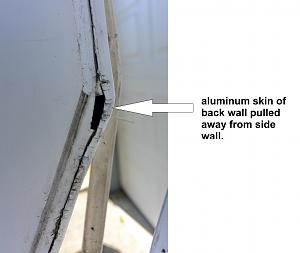
In Corner Damage B, I had removed the edge trim. I ended up removing this completely because at 17 years old I felt I should redo the sealant at all the screw holes anyway. In this image you can see the aluminum frame pulled away from the side shell. Check underneath to see what part of the frame will need to be screwed back together. It was easy to tap this back into place using a wood block and a hammer. Be very careful, I did wrinkle the rear aluminum skin slightly. However, it tapped back into place VERY nicely. I didn't even need to clamp.
Corner Damage C
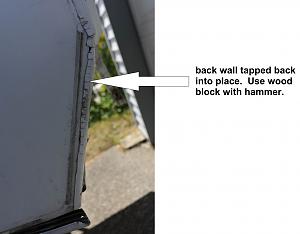
You can see I did wrinkle the rear skin slightly at the bend. Go slowly with this. I didn't go slow enough. However, the aluminum frame is back in place nicely.
Corner Damage D
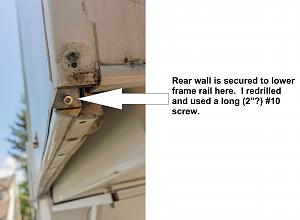
This is the critical part of the repair. Before you tapped the rear wall back into place, you should have seen what parts of the frame had to be screwed back together. I did not get a picture of this before screwing, but I do have a picture with the screw in place. I drilled at an angle so that a screw would go through both metal pieces. This worked nicely and the screw holds tightly.
The next post will show what I did to the corner trim piece, but the structural repair is now complete.
|

|

|
 09-18-2018, 11:14 PM
|
#10
|
|
Site Sponsor
Join Date: Nov 2016
Location: Vancouver BC
Posts: 1,520
|

Now that the structural repair is complete, the cosmetics can be fixed. When the rear wall was pulled away, the corner trim was partially pulled away from the aluminum frame. This caused dimples in the screw holes of the corner trim. See Corner Damage E:
Corner Damage E
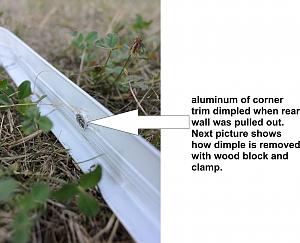
You can see the damaged screw hole.
Corner Damage F
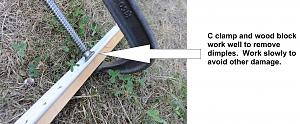
I used a small wood block and clamp. This worked nicely to flatten the screw holes again.
You noticed that not every screw hole was used in the corner trim. This is normal. However, what I have learned about sealing things on trailers is that edge beads of sealants are not to be relied upon. It is best to remove all screws, apply some RV type sealant to each screw hole, then insert the screw. It works well to insert a couple of screws first to hold the trim in place, apply the sealant to all the screw holes whether there is a screw or not, then insert and tighten the screws. You can then remove the couple of screws you inserted to hold the trim in place, apply a little sealant to the holes, then insert the screws.
This method is especially important when using stainless screws. If you do not use this method, galvanic action will erode the aluminum around the stainless screws. This can happen with steel screws as well. I have pictures elsewhere as evidence. Using sealant in the screw holes prevents water from getting between the two different metals.
Once the sealant has cured, you can insert a new vinyl insert into the track, then add a bead of sealant along the entire upper edge of the corner trim. Leave the lower edge without sealant. This way water can drain out.
(avoid silicone sealant, it's tough to remove when resealing).
|

|

|
 |
|
|
Currently Active Users Viewing This Thread: 1 (0 members and 1 guests)
|
|
|
 Posting Rules
|
You may not post new threads
You may not post replies
You may not post attachments
You may not edit your posts
HTML code is Off
|
|
|
|
 » Recent Threads
 |
|
|
|
|
|
|
|
|
|
|
|
|
|
|
|
|
|
|
|
|
|
|
|
|
|

