 |
|
 06-25-2019, 08:36 PM
|
#1
|
|
Senior Member
Join Date: May 2018
Location: Michigan
Posts: 80
|
 Another take on ventilating the Thetford Electra Magic
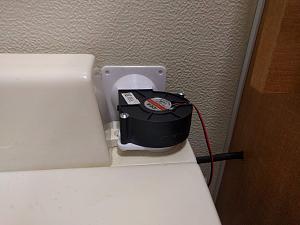
I bought a 12v centrifugal fan (aka squirrel fan) a while ago off of AliExpress for another project but I haven't used it yet. This is the fan I purchased:
75mmx30mm DC 12V 0.24A 2-Pin Computer PC Sleeve-Bearing Blower Cooling Fan 7530
I held it into place on the toilet on the right side as previous ventilation solutions have taken the fill gauge from the right side and put it on the left side and used the right side hole for the ventilation. Given the space considerations with the shower on the left, that makes sense to me.
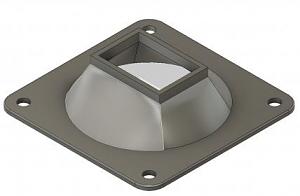
I made two adapters:
Adapter from Thetford vent/gauge hole to bottom of fan:
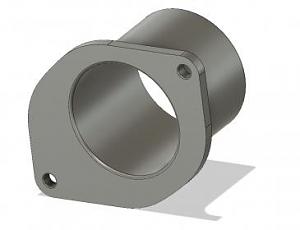
Adapter from fan nozzle to wall:
And then printed them out and:
I then took a closer look at the exterior vent cover for the plumbing vent. In a prior post, Bill mentions this is standard RV part and I realized I should design my exterior to have the exact same dimensions so I can later buy one of those vent covers and have it blend in. It's a roughly 4" across vent cover with a 2.5" internal opening (that reduces smaller inside however that might be a separate piece -- not sure how much it reduces exactly as I didn't measure).
I didn't cut any holes yet. I'm still mulling it over. Also, I would like a top cover for the fan as there are some small openings and I would like to hide the wires for esthetics but also because we have small children that are very curious.
My thinking for power is to tape into the power for the toilet flush. That will require either drilling a hole with a grommet or cutting a small channel in the bottom of the housing (that piece that has the Thetford logo with the flush button on one side).
__________________
2007 3124KB, 40 gallon water tank, weight distributing hitch
2006 Toyota Sequoia SR5 4WD
|

|

|
|
06-25-2019, 08:39 PM
|
#2
|
|
Senior Member
Join Date: May 2018
Location: Michigan
Posts: 80
|
I also realized for the adapter from the fan to the wall, I won't be able to reach those lower screw holes. However, if I were to have long screws that went all the way through the wall, I could use nuts on one side and have these screws hole on both the exterior vent cover and the interior fan to wall adapter. Any thoughts on if that is a good idea or if it's better to use shorter screws (or VHB tape) on each side to hold things to the walls?
__________________
2007 3124KB, 40 gallon water tank, weight distributing hitch
2006 Toyota Sequoia SR5 4WD
|
|
|
|
|
06-25-2019, 08:50 PM
|
#3
|
|
Senior Member
Join Date: May 2018
Location: Michigan
Posts: 80
|
__________________
2007 3124KB, 40 gallon water tank, weight distributing hitch
2006 Toyota Sequoia SR5 4WD
|
|
|
|
|
06-26-2019, 05:38 AM
|
#4
|
|
Senior Member
Join Date: Mar 2015
Location: Omaha, NE
Posts: 239
|
Very ingenious, Expanderoo! I think it would be great to have a thread where the 3D designs could be shared on this site.
__________________
[SIGPIC][/SIGPIC]
TM: 2005 2720SL -- lift kit, 15" Maxxis, LEDs, Husky ejack, GenPro soft start, 2300W gen, "H-Bridge", 1.44 cf Edgestar frig/freezer, 2xGC2, 1KW Inverter w/auto xfer switch, Trimetric Batt Monitor, 300W Solar (1 glass & 2 flex panels), EP Solar MPPT, Thetford Curve
TV: 2021 F-150 PowerBoost XLT Hybrid -- 7.2 kW Onboard Generator Option
Previous TV: 2012 Traverse -- "Stockton" 24V Boost Device
Map of where we've camped in our TM:
http://visitedstatesmap.com/image/IAMNMONEsm.jpg
|
|
|
|
|
06-26-2019, 05:39 AM
|
#5
|
|
Site Sponsor
Join Date: Jul 2006
Location: Blandford, MA
Posts: 1,045
|
Nice work. It is a clever way to deal with the toilet ventilation issue.
A few observations;
I noticed the fan placement blocks one of the screws holding the cover down pictured to the left of the fan. There is a small fuse under that cover which protects the flush circuit. In the event you need to check or change that fuse the fan assembly will have to be removed.
One option for mounting the inside wall plate is to use some variation of a French Cleat.
Dick
__________________
Dick & Jeri in Western MA
2003 2720 SL
2007 Ford Explorer Sport Trac Limited 4x4 - V8
Albums
|
|
|
|
|
06-26-2019, 12:52 PM
|
#6
|
|
Senior Member
Join Date: May 2018
Location: Michigan
Posts: 80
|
Dick,
That is a good point about the screw. I accidentally made the end of the fan-to-wall adapter on the fan end too small so it fits into the neck. I just tried to see if I could pivot the fan out of it if it was attached to the wall but it won't work. However, I realized there is no reason I can't take a portion of the fan-to-toilet adapter out that blocks the screw hole. Then the fan will still block the screw but taking out the two screws that hold the fan in place will allow removal of the fan and access to the screw.
On an unrelated note, my approach with these things is to try to design as simple as possible with as little material as possible (as 3D printing is kind of slow -- these adapters are simple enough that they only took about 1.5 hours to print each). Then later on, I'd like to take the same dimensions and make a nicer design that might be a couple of pieces that is more aesthetically pleasing (and potentially more functional).
This is the first time I've shared works in progress though and it's super helpful -- I wouldn't have thought about the screw. I do want to keep the fan over the top of the toilet because when/if I get to a later revision, I would mind having a design that blends in more with the design of the toilet. I also want to keep the blower of the fan roughly centered over the hole into the toilet.
I'm going to redo the designs with some minor changes in sizing but also fix that screw access issue. I also debated it and decided to keep it simple and mount the fan-to-wall adapter with screws on the inside and worry about the exterior vent cover separate (so it'll have it's own screws -- kind of following along with how the other vents were done).
__________________
2007 3124KB, 40 gallon water tank, weight distributing hitch
2006 Toyota Sequoia SR5 4WD
|
|
|
|
|
06-26-2019, 01:16 PM
|
#7
|
|
Senior Member
Join Date: May 2018
Location: Michigan
Posts: 80
|
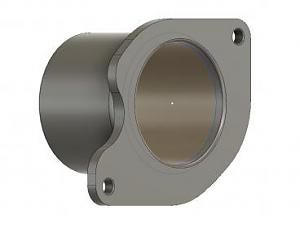
Okay, minor tweaks to the fan-to-toilet adapter:
* cut out part of the mount that interfered with the screw
* increased overall size of the tube that goes into the toilet for a snugger fit -- went from 48mm to 48.4mm and also decreased the inner diameter of the shaft from 44 to 42.4mm (so our wall thickness is increased from 4mm to 6mm, I wanted a little more strength in the wall just in case)
* add another 3mm in length of the tube (doesn't quite clear the top of the screw tab)
It looks like:
__________________
2007 3124KB, 40 gallon water tank, weight distributing hitch
2006 Toyota Sequoia SR5 4WD
|
|
|
|
|
06-26-2019, 01:21 PM
|
#8
|
|
Senior Member
Join Date: May 2018
Location: Michigan
Posts: 80
|
And minor tweak to the fan-to-wall adapter -- I increased the width of the rectangle that goes into the fan's "mouth" by 2mm to match dimensions (not sure how I got off earlier). Looks the same.
__________________
2007 3124KB, 40 gallon water tank, weight distributing hitch
2006 Toyota Sequoia SR5 4WD
|
|
|
|
|
06-26-2019, 01:23 PM
|
#9
|
|
Senior Member
Join Date: May 2018
Location: Michigan
Posts: 80
|
Quote:
Originally Posted by commodor47

One option for mounting the inside wall plate is to use some variation of a French Cleat.
|
I like this idea but I'm pressed for time so I think I'm going to go with the easier route of using screws where accessible and otherwise using some VHB tape (but very thing piece). But I will think about this more as a cleat approach would definitely be cleaner.
__________________
2007 3124KB, 40 gallon water tank, weight distributing hitch
2006 Toyota Sequoia SR5 4WD
|
|
|
|
|
06-26-2019, 01:25 PM
|
#10
|
|
Senior Member
Join Date: May 2018
Location: Michigan
Posts: 80
|
Quote:
Originally Posted by klpauba
Very ingenious, Expanderoo! I think it would be great to have a thread where the 3D designs could be shared on this site.
|
Yeah, I think that would be a good idea. I'm happy to share these designs here (and on Thingiverse). My hope with this first iteration is to have something I'm happy enough with to cut into the wall of the trailer  .
__________________
2007 3124KB, 40 gallon water tank, weight distributing hitch
2006 Toyota Sequoia SR5 4WD
|
|
|
|
|
|
|
Currently Active Users Viewing This Thread: 1 (0 members and 1 guests)
|
|
|
 Posting Rules
|
You may not post new threads
You may not post replies
You may not post attachments
You may not edit your posts
HTML code is Off
|
|
|
|
 » Recent Threads
 |
|
|
|
|
|
|
|
|
|
|
|
|
|
|
|
|
|
|
|
|
|
|
|
|
|


 Linear Mode
